How to display SMS messages with a projector
We will show you how to prepare Ozeki SMS Wall on a Windows PC. In this detailed guide you will see the process from connecting the Sierra Wireless GPRS Modem until sending your first SMS to it.

STEP 1: Download and Install Ozeki SMS Wall
Please proceed to the downloading site and download the software.
|
|
Ozeki SMS Wall can be downloaded from the following webpage: Download Ozeki SMS Wall Trial! |
Then you should unzip it before intallation.
Now you can install it, we prepared an installation guide for you.
STEP 2: Prepare the prerequisites
You should check if all the required device is available for you (Figure 1).
You will need a

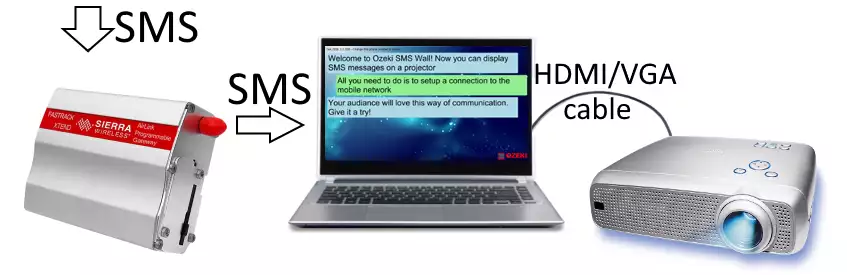
STEP 3: How it works
The incoming SMS messages are received by the GSM modem. The Ozeki SMS Wall reads out the SMS text messages from the GSM modem. The new messages are displayed on the SMS Wall screen (Figure 2).
STEP 4: Setup the GSM modem hardware
Start by inserting the SIM card into the GSM Modem (Figure 2). You need to know the phone number belonging to the SIM card for later use. You will send a test SMS to it to check if your SMS Wall is fully prepared.

Then please plug the GSM Modem into the power outlet (Figure 3)

Now you have to create a connection with the laptop. Plug the GSM Modem into the USB slot of the laptop (Figure 4). This will let the SMS messages floating from the GSM modem to your laptop.

STEP 4: Setup the GSM modem driver
To make sure that the GSM modem is fully installed you need to download the driver for it. If you have bought a Sierra Wireless GPRS Modem then please download the driver from our site..
After unzipping it you will find a driver for 64 bit and 32 bit PC-s.
Now please right click on 'This PC' icon and open it in Manager mode (Figure 5).

After that in the 'Computer Management' table select 'Ports (COM & LPT)' in the 'Device Manager' menu (Figure 6).

Right click on the USB device with the missing driver and select 'Update Driver Software'. Then choose the directory of the Sierra Driver (Figure 7). After clicking next the driver should be installed.

Now you can go back and connect the SMS Wall software to the GSM modem.
STEP 5: Start Ozeki SMS Wall and setup the GSM modem connection
You should find Ozeki SMS Wall installed on your laptop. Click on the desktop icon to start it (Figure 8).

Your browser will open up with the login screen. Enter the login details that you have previously set when installing the product (Figure 9).

On the welcome page tick 'Take me directly to the dashboard after login' and click on the blue 'Get started' button (Figure 10).

Now you will learn how to setup the connection.
Setting up the connection is essential. Without doing it your wall would be unreachable. It guarantees that people can post SMS messages on your Wall. You can choose from connecting to a GSM modem or connecting to an SMPP gateway. In this tutorial we will show you how to connect to the Sierra Wireless GPRS Modem step-by-step.
To do this first you need to click on the 'Connect to the mobile network' button on the home screen (Figure 11).

Now you can see the 'SMS Connections' page where it is possible to create connections. Click on the 'Create new connection' button and select 'SMS modem' (Figure 12).

In the bottom of the following form please select the COM port you used for connecting the GSM modem and click on 'Autodetect'. If you click on the eye you will see the results (Figure 13).

Your setup GSM modem connection has appeared in the 'Connections' list (Figure 14). If it has been successfully connected you should see a green tick next to it. Finally click 'Home' to go back to the Wall.

STEP 6: Sending an SMS to the SMS wall
Now you can grab your mobile phone and send you first SMS to the Wall (Figure 15)

The sent SMS message will be seen in the 'Incoming messages' section (Figure 16). Here you are able to delete or highlight it.

After the message delay have passed, your SMS will appear on the SMS Wall (Figure 17). Now it is time for setting the SMS Wall to fullscreen mode.

This is how your SMS Wall with the received SMS messages look like in fullscreen mode (Figure 18).

Order a Sierra Wireless GPRS Modem
