
 Sign in
 Send SMS from MySQL (part 1/4)
MySQL Installation
MySQL is a Database management system which is used in an industrial environment. It is based on the Structured Query Language (SQL). The most common use for my SQL however, is for the purpose of a web database, for example an inventory of an online store. It can work together well with the Ozeki SMS Gateway, but you need to connect these two software. The first step for it to install these softwares to your computer.
Video content1. Download MySQL
2. Install MySQL
Please jump to the next video or if you scroll down you can find screenshots that describe how to download and install MySQL database server.
First, you need to acquire the files you need for the installation. To do that, please head over to the download page of MySQL , and search for the MySQL Community version. Click the link and it will take you to the community download version selector page. You can see the download page on Figure 1.
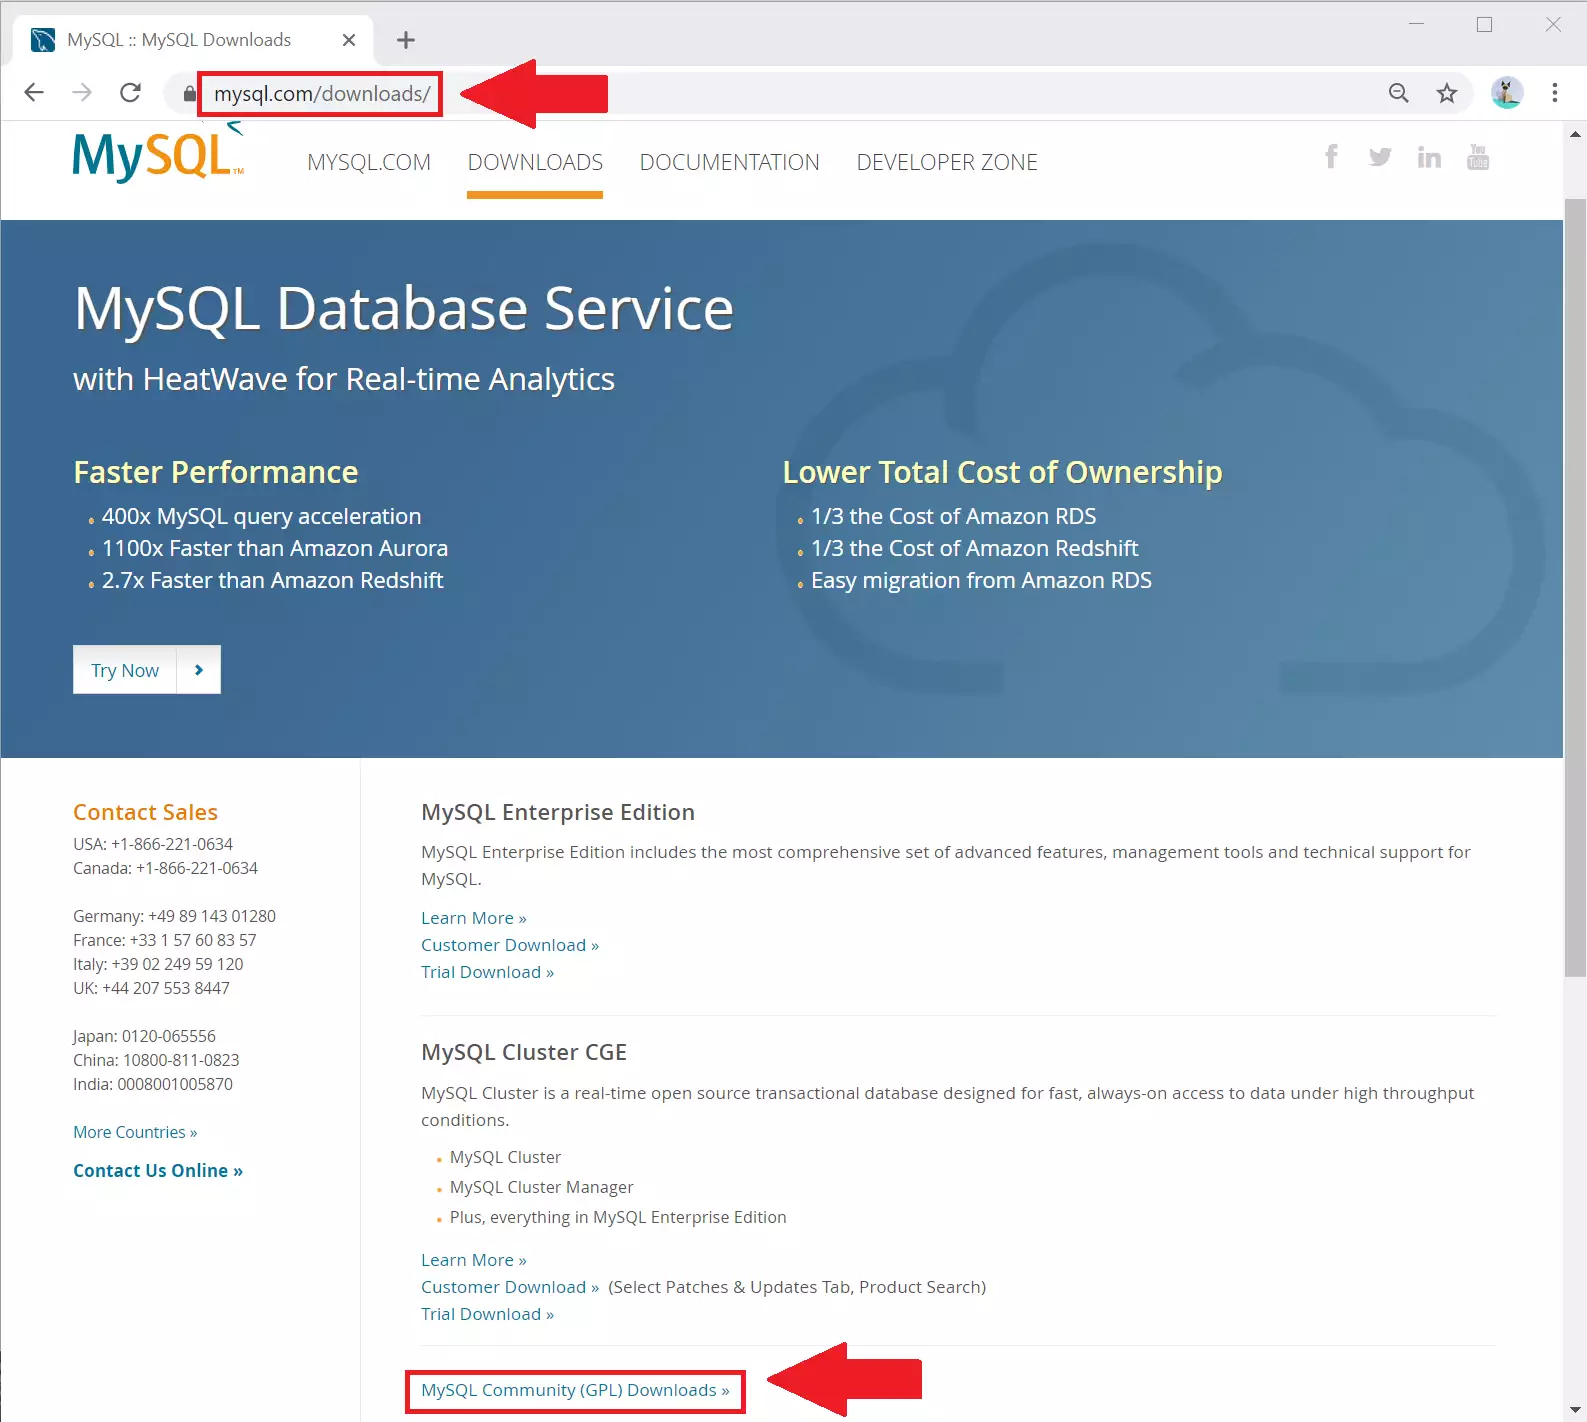
Now you are on the download version selection page of MySQL. It is important to make sure that you download a Community edition of the software, because it is free of charge to use it, with some locked functions, but you get everything you need to connect the Ozeki Gateway to MySQL. You need to look for a link titled “MySQL Installer for Windows”. You can find it with the help of Figure 2. Click it and you will be presented with the download page.

Now on this page, you get to choose your preferences. First of all, you can choose whether you use Windows or other as your operating system. In our case, we use Windows. Now below that, you can see multiple Installers. The smaller downloadable file is a web version of MySQL, make sure to download the bigger one, as you can see on Figure 3. Click the "Download" button to start the process.

To take full advantage of MySQL, we advise you to create a new account on this step. It is a simple process which should not take more then 10 minutes. If you wish to skip the account creating procedure, you could click the No thanks, just start my download. button, and your browser should start downloading the files you need.

As you can see on Figure 5, your browser downloads the required files. It should not take long, but it depends on your internet speed. If it is finished, please click it.

Now your computer should launch the MySQL Installer. This will guide you through the steps of setting up your new SQL Server. Here you should choose the Server Only option. This will install the application in a way that you can use a MySQL Server, but you don’t need to develop SQL tables. Click Next if you have the option chosen. You can see the selection on Figure 6.

In this step, you will see the products, you are installing. If you chose the Server Only option on the last step, your list should look like ours on Figure 7. Click Execute if you wish to install those applications.

In this step, you will configure your database server to your preferences. You can choose a config type, than pair a port to your server. Make sure to tick in the Open Windows Firewall ports for network access box, so your firewall will not disturb the dataflow on the port of your server. If you have everything matched with your preferences, please click Next. You can see our preferences on Figure 8.

Now you can get to choose the authentication method of the server. It is a very important step, because you need to have a secure server which only could be modified by the person with the right permission. On this step, you have two options. The first on is a more secure password encryption system, the other one is an older Legacy Authentication method. Make sure to choose the newer and more secure Strong Password Encryption for Authentication method. You can see your options on Figure 9. Click the Next button to proceed.

If you choose the more secure method in the last step, you will be presented with the root account password creating window. Please type in a password that is hard to guess, but you will remember easily. Make sure that only you now this password, in order to have a secure server. You can see the password creating process on Figure 10.

Now you need to name your server. It is an important step, because in the Windows service, you will see your server with this name. Make sure that the Start the MySQL Server at System Startup option is ticked in, so your server will start as soon as windows. This way, your database server will always be ready to use. You can see your options on Figure 11.

On the final step of the installation, you get a summary of all the customization you have done on your SQL Server. To finalize your decision, please click the Execute button as you can see on Figure 12. You installer will start setting up all the necessary things you need to have in order to start using the MySQL Server.

After the installer finished the process, all list members should have a check mark before it. In this case, you have a working copy of MySQL Server. If you wish to exit the installer, click the Finish button.

Create ozeki database schema
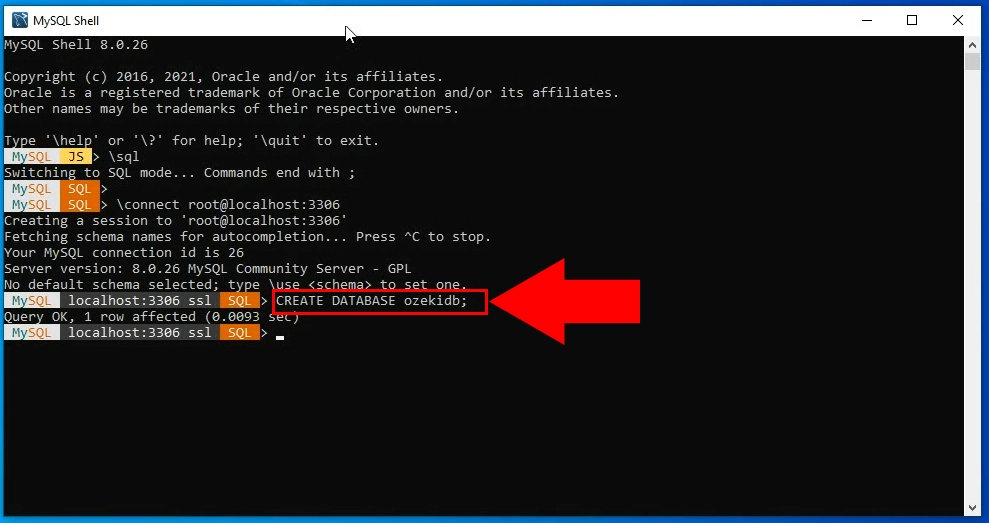
CREATE DATABASE ozekidb;

CREATE USER 'ozekiuser'@'localhost' IDENTIFIED BY 'ozekipass';
GRANT ALL PRIVILEGES ON ozekidb.* TO 'ozekiuser'@'localhost';
FLUSH PRIVILEGES;


CREATE TABLE ozekimessagein (
  id int(11) NOT NULL auto_increment,
  sender varchar(255) default NULL,
  receiver varchar(255) default NULL,
  msg text default NULL,
  senttime varchar(100) default NULL,
  receivedtime varchar(100) default NULL,
  operator varchar(100) default NULL,
  msgtype varchar(160) default NULL,
  reference varchar(100) default NULL,
  PRIMARY KEY (id)
  ) charset=utf8;
  ALTER TABLE ozekimessagein ADD INDEX(id);

CREATE TABLE ozekimessageout (
  id int(11) NOT NULL auto_increment,
  sender varchar(255) default NULL,
  receiver varchar(255) default NULL,
  msg text default NULL,
  senttime varchar(100) default NULL,
  receivedtime varchar(100) default NULL,
  reference varchar(100) default NULL,
  status varchar(20) default NULL,
  msgtype varchar(160) default NULL,
  operator varchar(100) default NULL,
  errormsg varchar(250) default NULL,
  PRIMARY KEY (id)) charset=utf8;
  ALTER TABLE ozekimessageout ADD INDEX (id);
More information