
 Sign in
 Ozeki Softphone from a remote computer
This tutorial will guide you through the setup of a remote access softphone. A softphone is a program that lets you make phone calls without your cellphone, using a computer. You will need to make a certificate to use the remote feature safely. A certificate is an electronic document used to prove the ownership of a public key, which is used to establish connection to a remote access webpage. The tutorial is explaining everything in small steps, so you will have no hard time following it.
Step 1: Login
The first step to setup a remote computer for an Ozeki Softphone is to login to your Ozeki account using your username and password. We used example credentials in Figure 1.
Step 2: Open Security App
Now on Figure 2, you can see the Ozeki 10 desktop. Here you need to open the “Start” menu and the hover over “Programs”, choose “Administrative tools” and click “Security”. You can see every button to click on Figure 2.
Step 3: Generate Certification
Now you are presented the security application of Ozeki 10. You need to get to the "Certificates" window. To do that, click the "HTTPS" button on the upper left side of the screen. You can find it via Figure 3.

Here is the “Certificate” window. To make a new certificate for remote access, please click the “Create new certificate” button, as you can see on Figure 4.

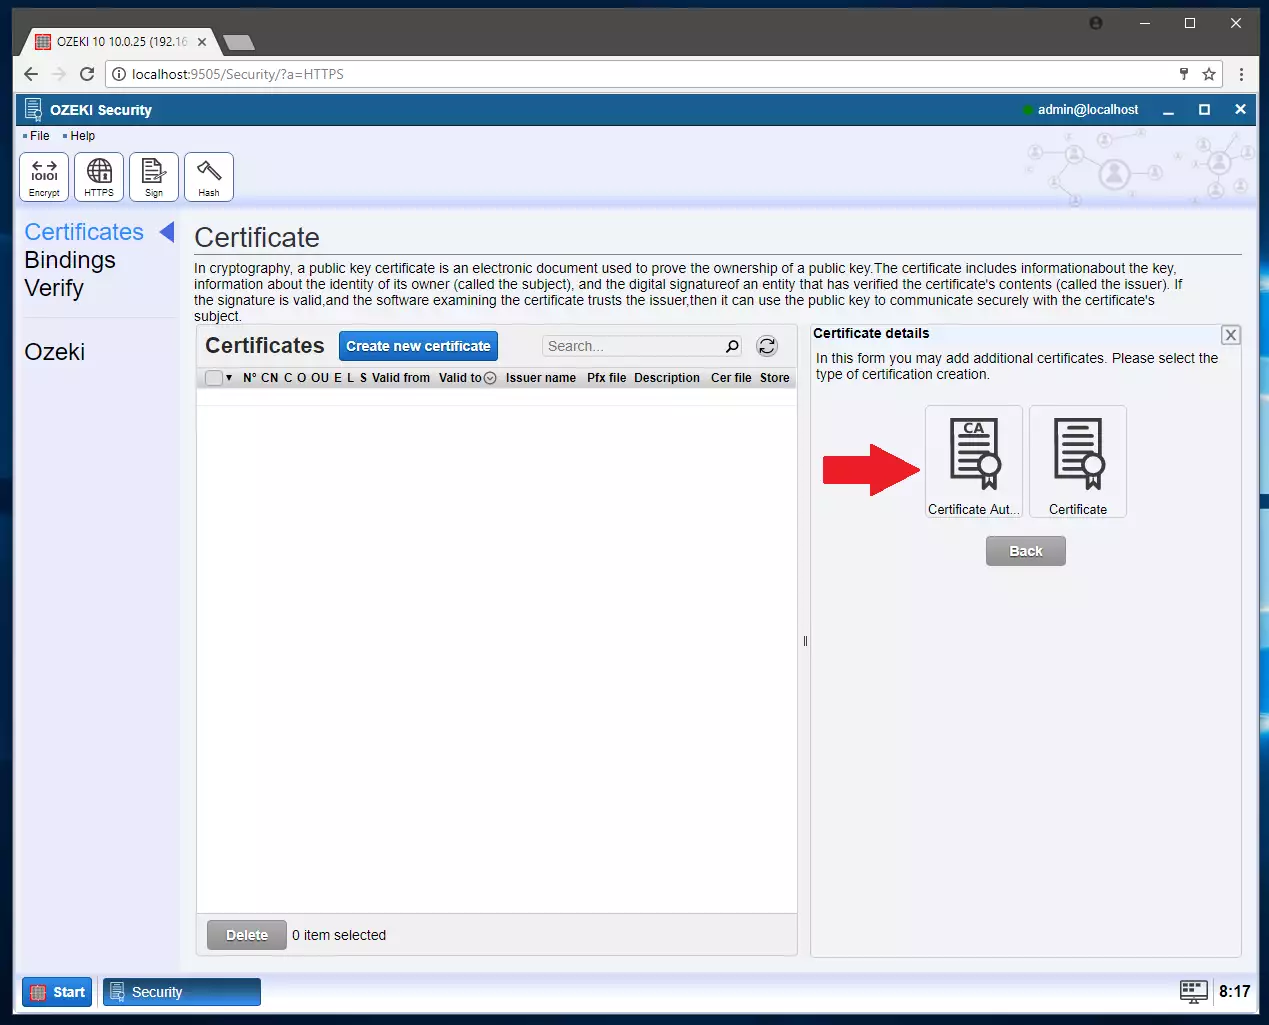
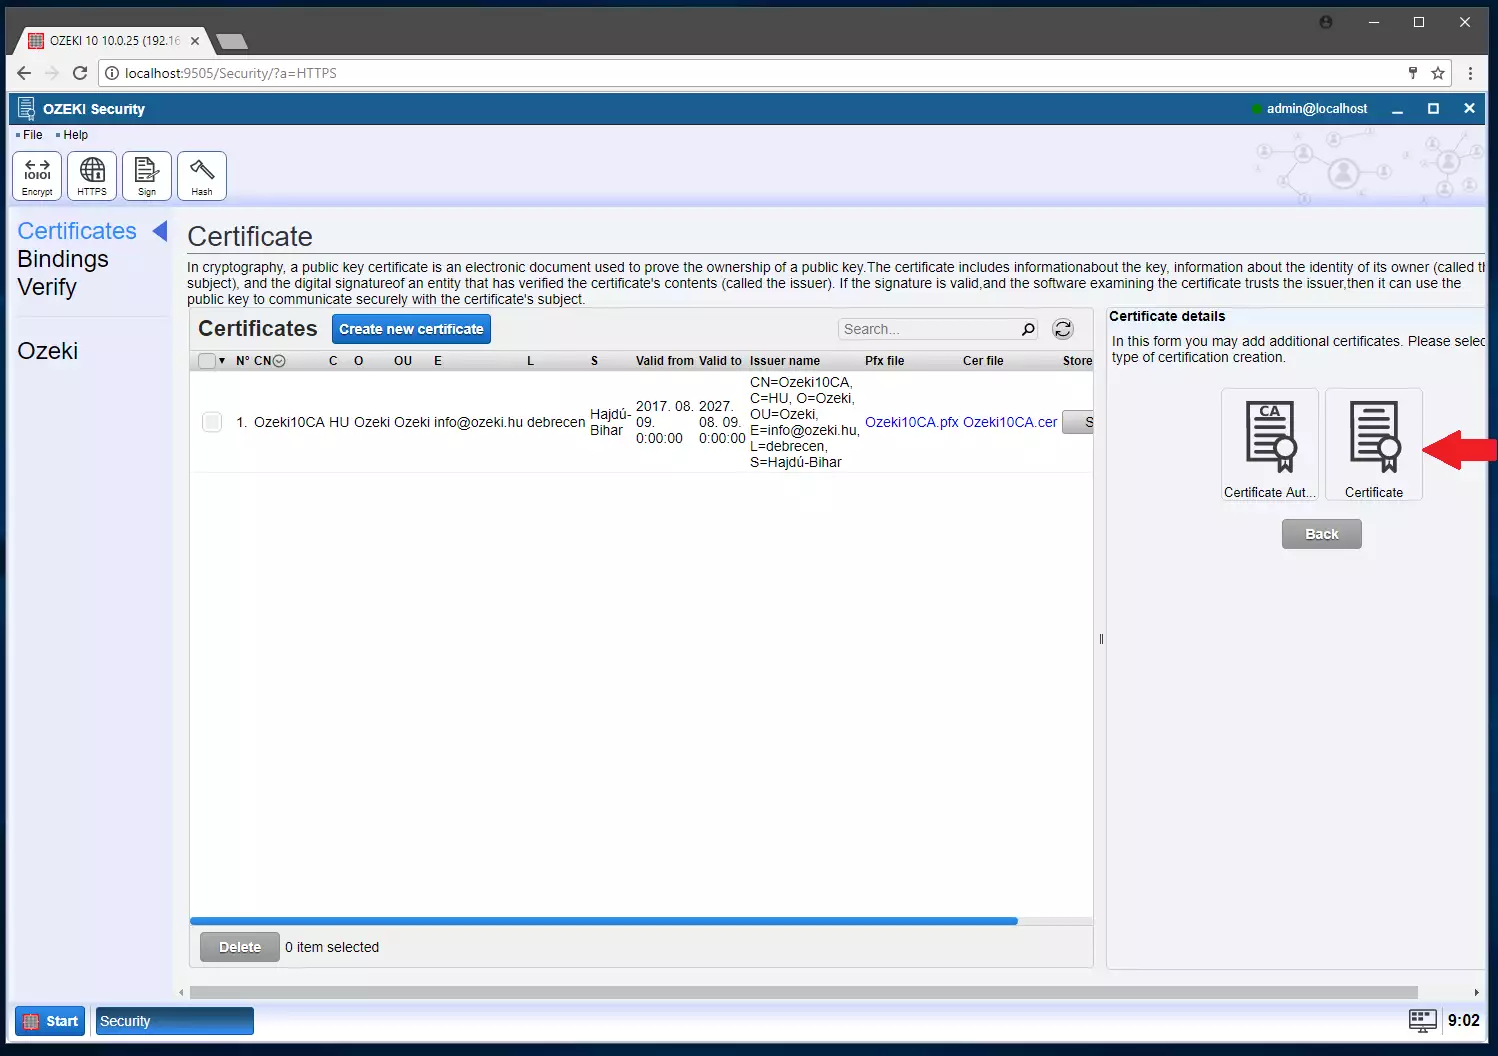
Now on the right side of the screen, you will be able to choose to upload your finished certificate with the button on the left, but now, you need to click the button on the right which is the "Certificate details" button,as it is presented on Figure 5.

Now you have two choice, to create a certificate for the remote access, you need to choose the “Certificate Authority” option, as we did on Figure 6.
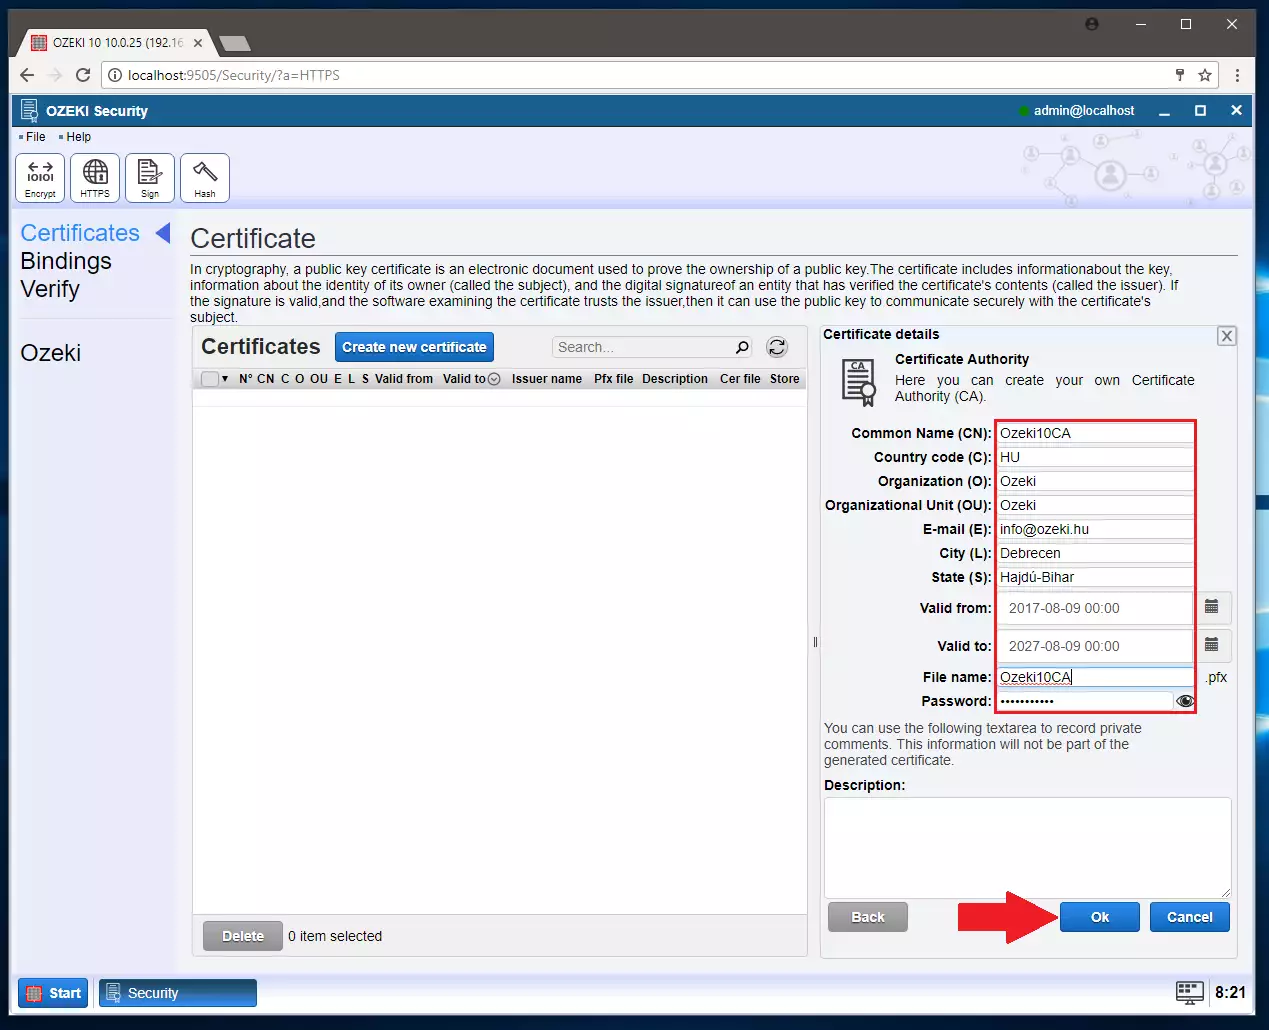
On Figure 7, we provide information about how the “Credit Authority” panel should be completed. After you completed it, click the “Ok” button to save it.
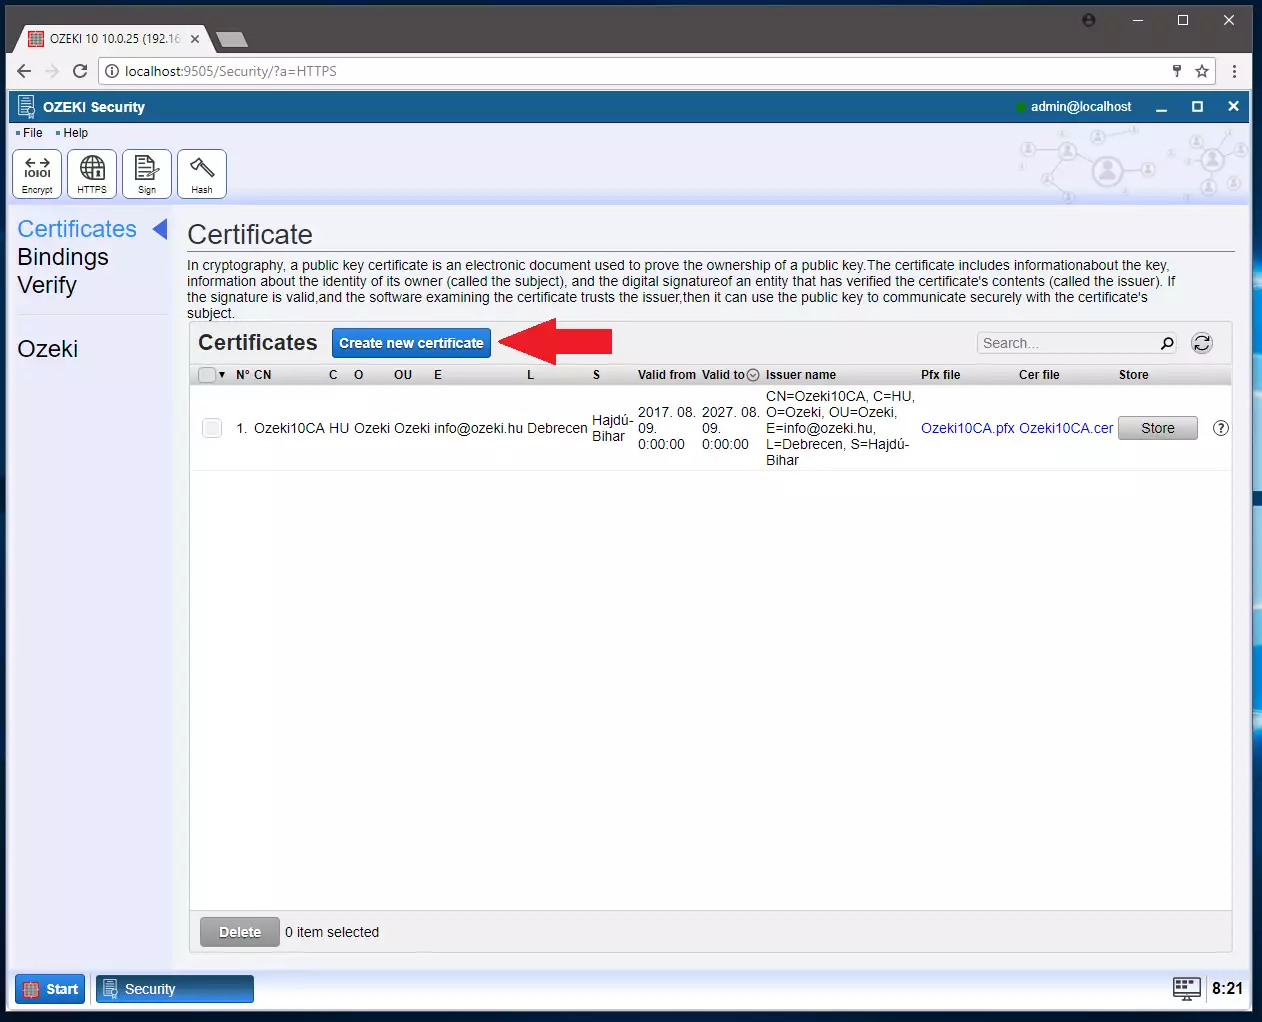
Now you need to create another certificate. To do it, just click “Create new certificate” button. You can find it via Figure 8.
Now you need to click the “Certificate details” button again as you can see on Figure 9.
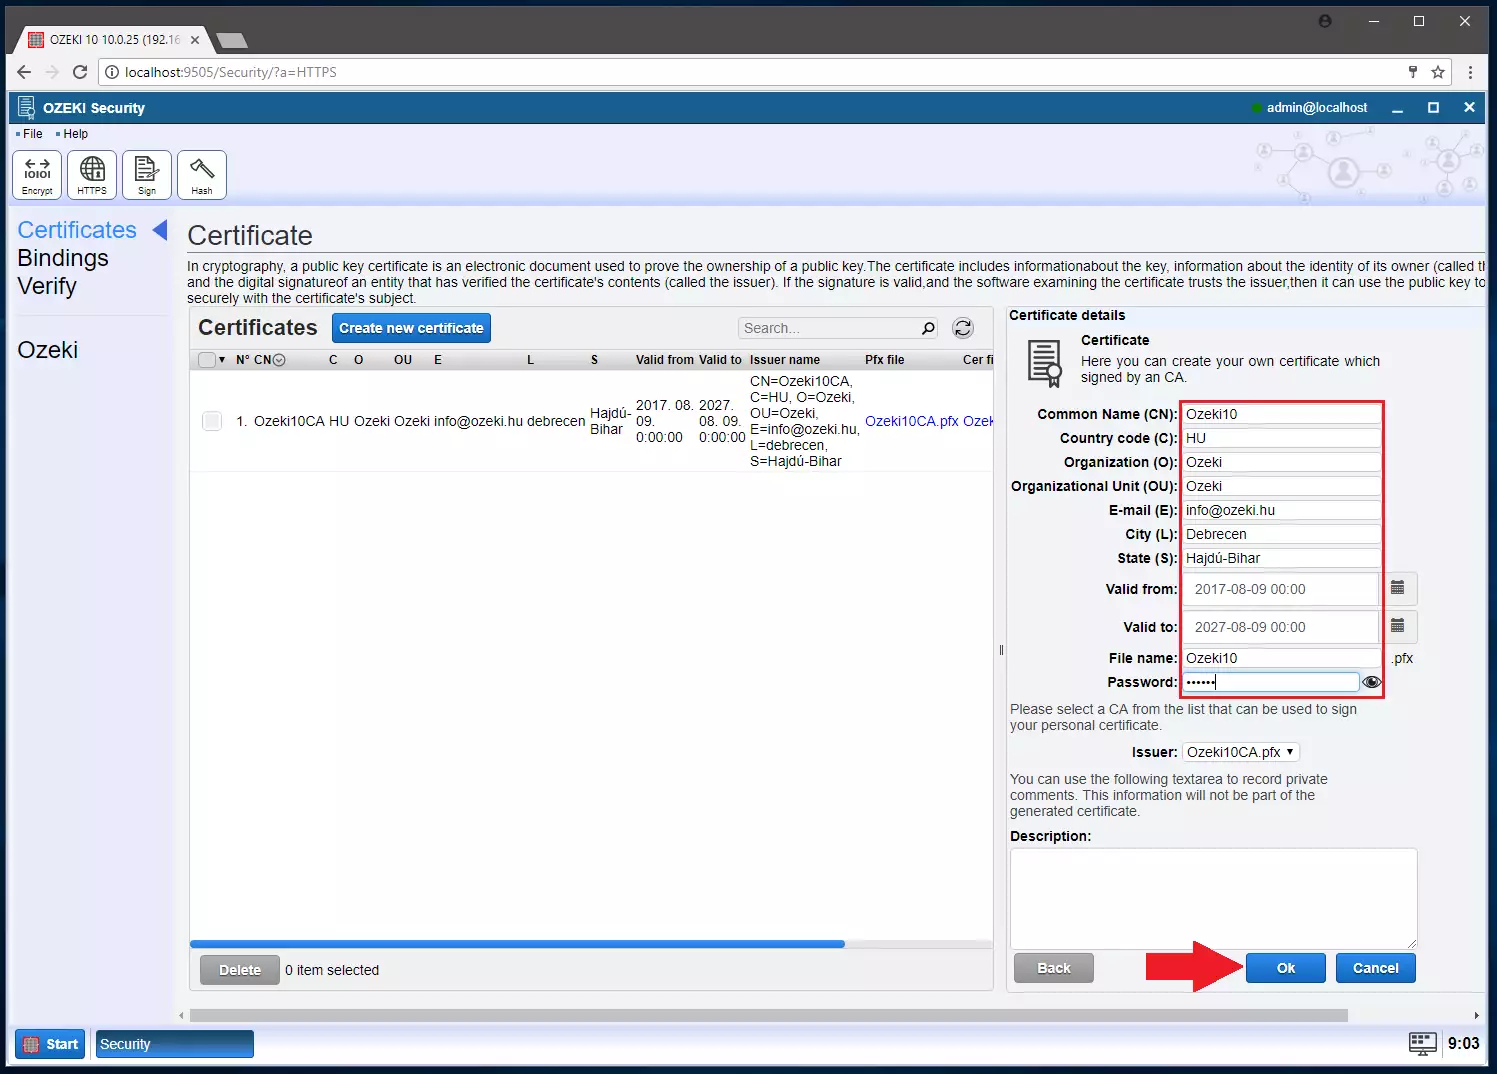
Now you need to click the “Certificate” button on the right side of the “Certificate details” panel, as it is demonstrated on Figure 10.

Step 4: Change GUI to HTTPS
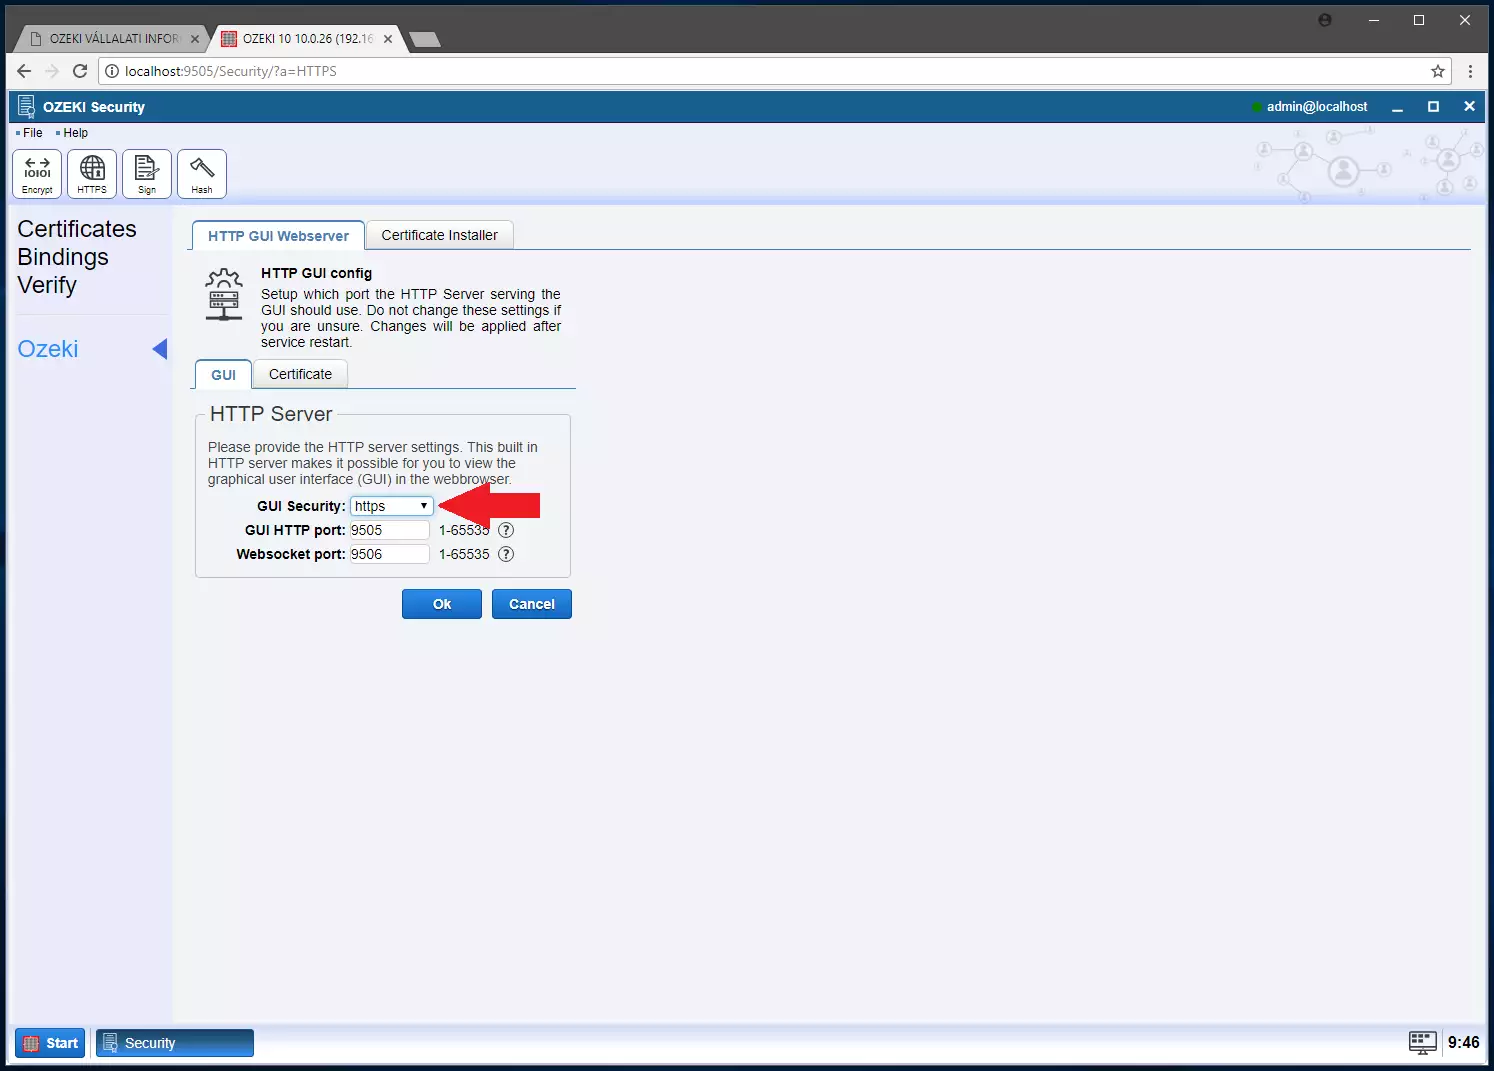
After it, you need to change the setting of GUI to HTTP. To do that, head over to the “HTTP GUI config” panel, by clicking the “Ozeki” button, which you can find via Figure 12.
Now that you are on the “HTTP GUI config” panel, change the GUI security options value, to “https”, as you can see on Figure 13.
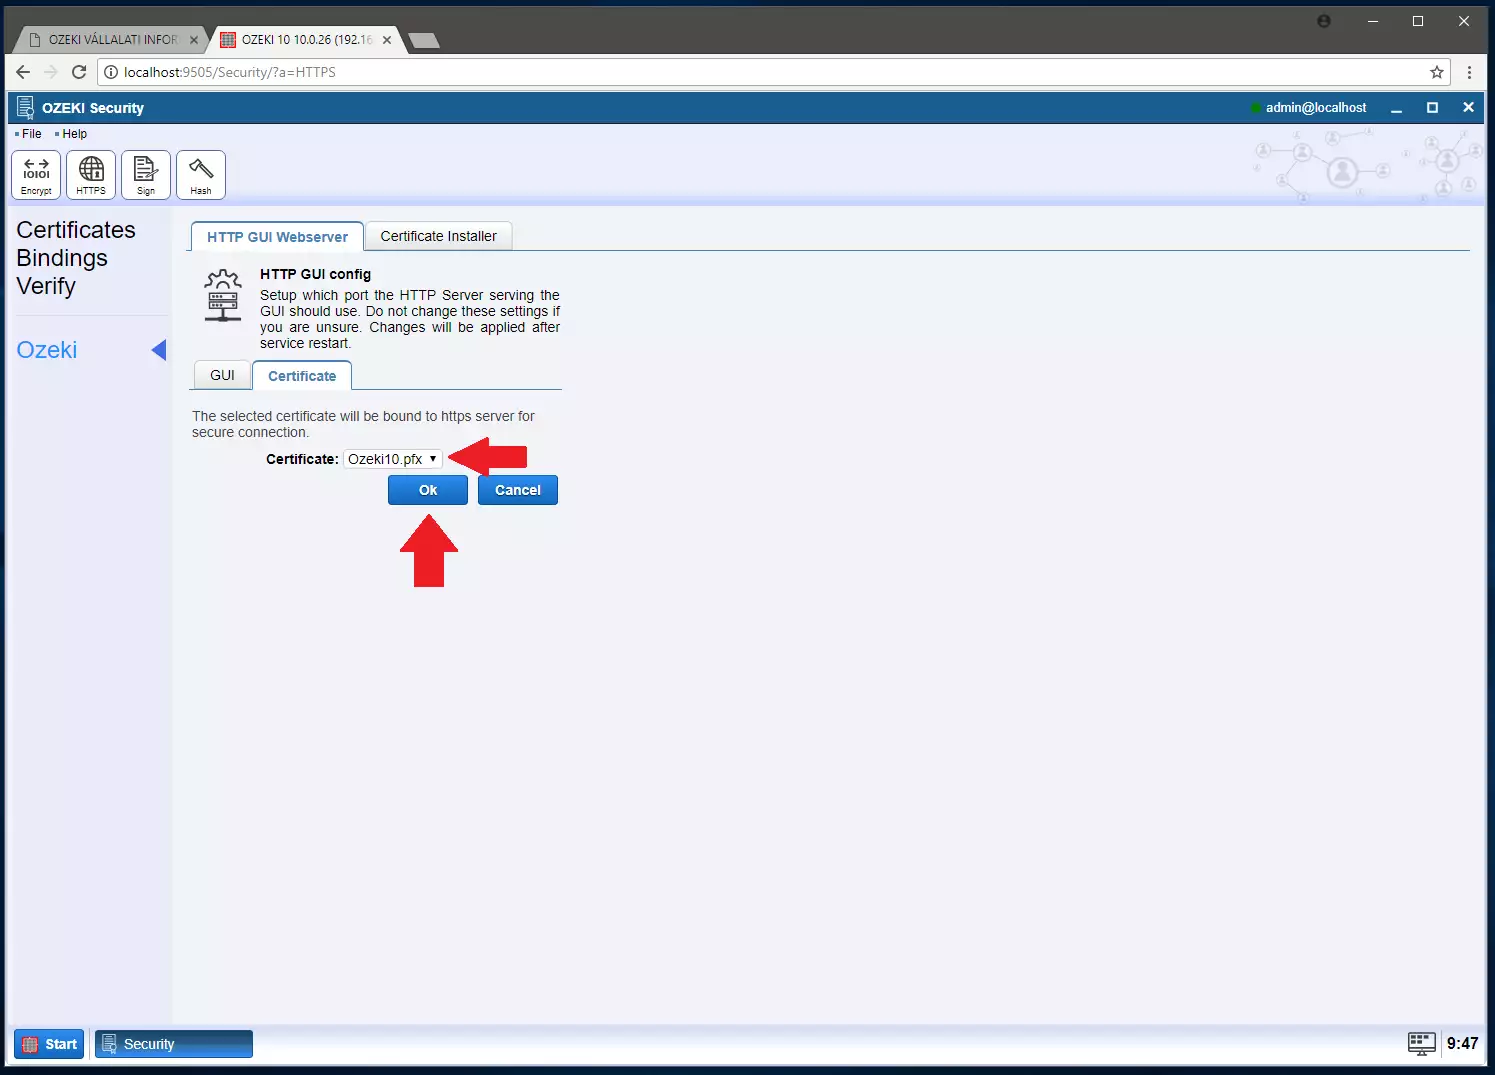
On Figure 14, you can see, that above the changeable options, you can find two tabs. Head over to the one titled “Certificate”. Now, on this window, you can bound your certificate which you just made, to the http server for a secure connection. To do that, set the “Certificate” to your own “Ozeki10.pfx” file. In our case, it is “Ozeki10.pfx”.
Step 5: Login on another computer
Now you need to open a browser on the computer you want to use to remotely access the softphone. Type in the IP Address of your own HTTP server and hit enter. The windows you can see on Figure 15 will pop-up. Do not worry, just click on “Advanced” and then on “Proceed to…”. This way you can access your softphone.
Now you need to login with your Ozeki 10 login credentials. We used example credentials on Figure 16.
Step 6: Download certificate installer
Now you will need the Ozeki Certificate Installer. To get the program, you need to head over to the “Security application”, as we demonstrate on Figure 17.
Now click on “HTTPS” button on the upper left side of the screen. You can find it via Figure 18.
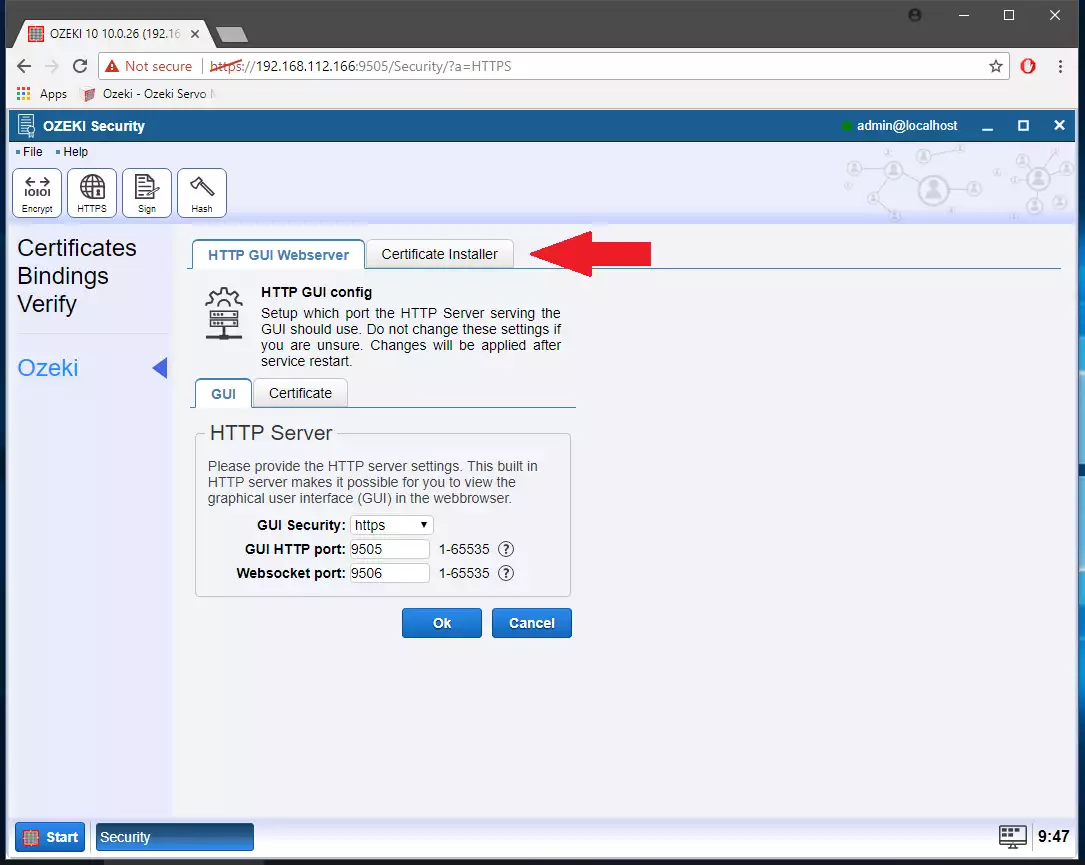
Now head over to the HTTP GUI config menu, by clicking “Ozeki” on the left side of the screen. We demonstrated it on Figure 19.
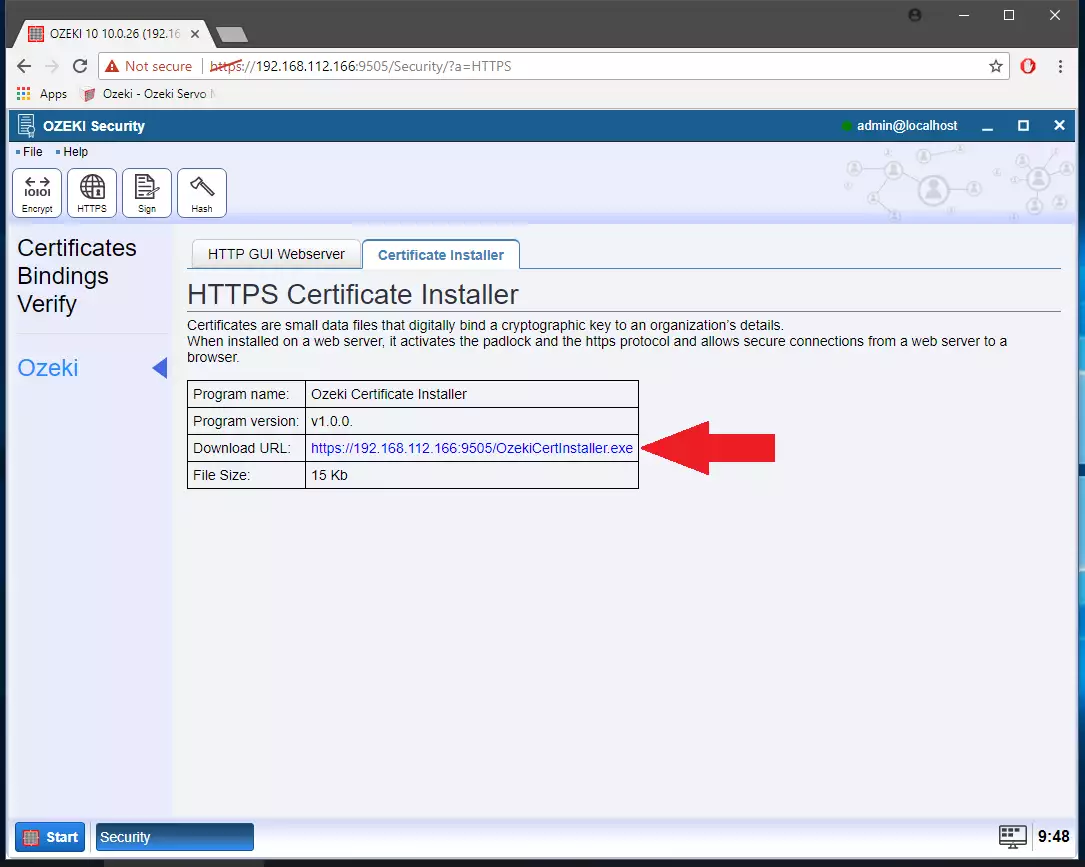
Now please click the “Certificate Installer” above the “HTTP GUI config” title, what you can find on Figure 20.
Here you can find the download link of the “HTTPS Certificate Installer”. Click the link next to the "Download URL" title. Figure 21 helps you find it.
Step 7: Download certificate
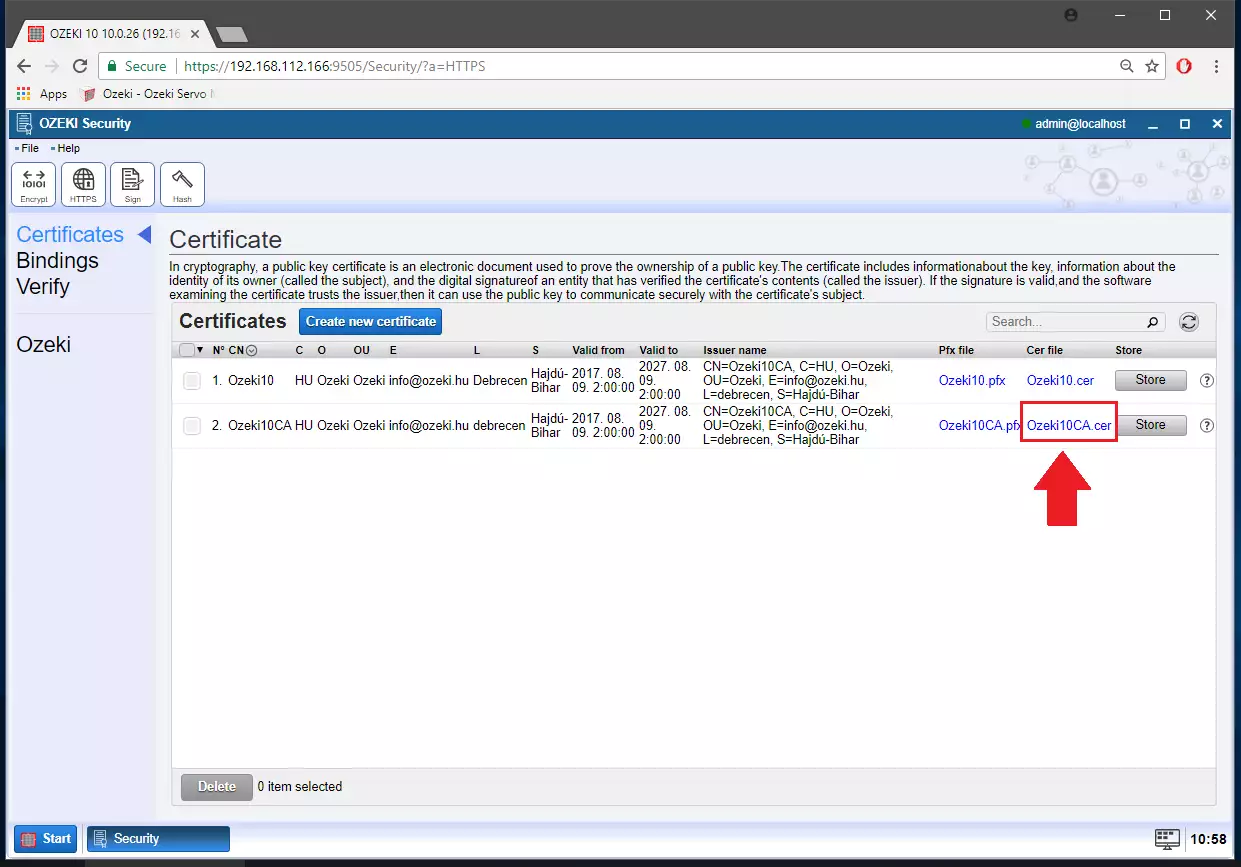
Now you need your certificate on your computer. This way you can install it with the certificate installer. To download your document, go to the certificates window, and click the “Cer file” link next to your certificate to download it. With Figure 22, we help you find it.
Step 8: Install certificate
The next step is to install your certificate. to do that, open the certificate installer, find your “.cer file” with the file “browse” button, and click on “Install certificate”. We show you everything on Figure 23.

If everything goes in order, the certificate installer should write “Successfully installed certificate”. You can see the message on Figure 24.

Step 9: Restart Browser
Now you need to restart your browser by closing it, and reopening it again, as we demonstrate on Figure 25.
Step 10: Test Call
Now you can make your first test call. On the desktop of Ozeki 10, find the icon of the “Softphone”. You can find it via Figure 26.
Click on the “Config” button to start registering your device as you can see on Figure 27.
Now click on the “SIP PBX account” button to proceed with the registration. You can see the button on Figure 28.
On Figure 29, we provide information about how the “SIP PBX account details” panel should look like after you completed it.
Now click "Register" on your device, and it should register itself automatically. You can see the button on Figure 30.
Now you are finished. You can now access your softphone remotely. Please make a test call to make sure everything works correctly. Your device will print out the number which the called phone will display, as you can see on Figure 31.
We hope that this guide was helpfull. If you have any problem with any of the steps, feel free to contact us at info@ozeki.hu
More information
- Ozeki Softphone in a Webbrowser
- Ozeki Softphone from a remote computer