Scheduled outgoing SMS messages
On this page software developers can learn how to schedule outgoing SMS messages. After the introduction about the use of scheduled SMS messages, we list the prerequisites, provide a brief solution overview along with a step-by-step guide, and we explain how scheduled SMS sending can be tested using the MySQL Command Line Client.
Introduction
Scheduling outgoing SMS messages allows users to send out the messages at a chosen date and time. There are situations where scheduling SMS messages can be very useful. For instance, if:
- you need a reminder to send a birthday or any other greeting.
- you would like to send an SMS message when the charge for sending it is lowest (some servive providers may offer lower charges at specific times, e.g. at night or weekends).
- you would like to send a message to someone in a distant time when they are probably not asleep.
- a firm would like to inform its customers about a mandatory service (e.g. a car company).
- a hospital would like to send SMS about notification of an upcoming periodic survey
- a firm would like to send a reminder about an upcoming event (e.g., 3 hours before the start of a meeting).
Prerequisites
To send scheduled SMS messages, you need to have:
- Ozeki Message Server 6 installed (To find out how to install it, check out the Installing the server page.)
- GSM Modem (To find out how to install its driver, check out the Installing the GSM Modem Driver page.) When you have installed Ozeki Message Server 6, you need to configure a driver to have SMS connectivity. You can set up more than one GSM modem or IP SMS connection.
- Database plugin installed for the Ozeki Message Server (To find out how to install it, check out the Database plugin installation page.)
- Database Server installed (MySQL, Oracle, MSSQL etc.) This guide will present a solution with a MySQL Server below.
- ODBC driver installed for the Database Server For MySQL server the MySQL Connector/ODBC driver.
Solution overview
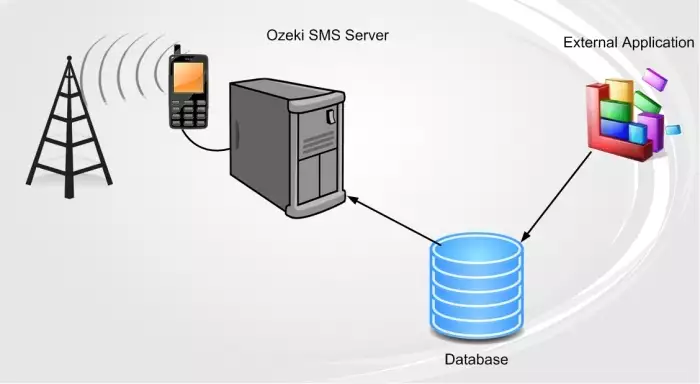
The idea behind sending scheduled SMS messages is periodically polling a database server for messages that should be sent at a specific time (Figure 1). If it is later than this specific time, and the database contains a message due to be sent out at the specific time, the server sends it out (if it has not been sent yet). The Ozeki Message Server does the hard work (after some configuration); you just need to insert your message into the database with a parameter telling the Server when to send this message.

Figure 1 - Scheduled SMS Messaging with the Ozeki Message Server Solution (Step-by-step guide)
Step 1
Install Ozeki Message Server 6 and configure it for SMS connectivity. You should have no problem doing it, just follow the on-line manual. Check out the Installing the server page, and the Installing the GSM Modem Driver page.
Step 2
Now you need to install a database server which will store your scheduled SMS messages. You can download a free MySQL database server from http://dev.mysql.com/downloads/mysql/5.0.html#downloads, or you can use any other, such as Oracle, Access, MS SQL, Postgres, Sybes, etc. This guide will focus on the MySQL server. You should have no problem installing the server; choose the Standard Configuration, install it as a Windows service and specify a root password which will be required if you would like to access the MySQL Server.
Step 3You need to create a database for storing scheduled SMS Messages. For this, run the newly installed MySQL Command Line Client. Enter the root password and execute the following commands:
CREATE DATABASE ozekisms;

USE ozekisms;

CREATE TABLE ozekimessageout (
id int(11) NOT NULL auto_increment,
sender varchar(30) default NULL,
receiver varchar(30) default NULL,
msg varchar(160) default NULL,
timetosend varchar(100) default NULL,
senttime varchar(100) default NULL,
receivedtime varchar(100) default NULL,
reference varchar(100) default NULL,
status varchar(20) default NULL,
msgtype varchar(160) default NULL,
operator varchar(100),
PRIMARY KEY (id)
);
This will create a new table called ozekimessageout in a new database called ozekisms. This table will hold the scheduled SMS Messages.
Step 4
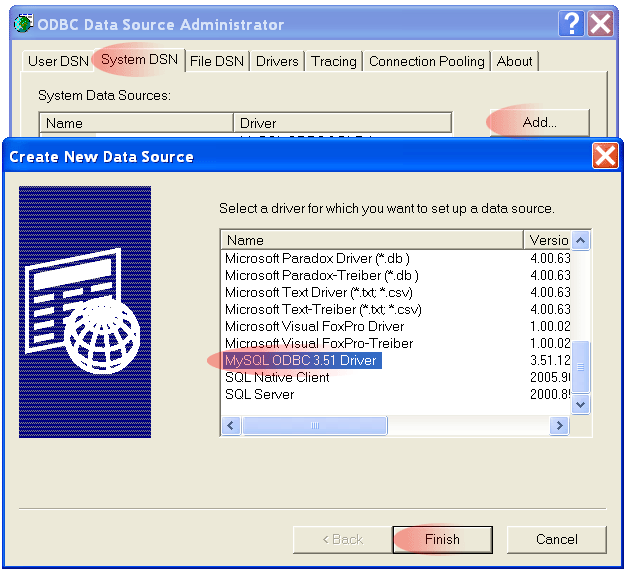
The Ozeki Message Server will connect to your database through a standard ADO or ODBC connection, so you need to install one. For the MySQL server you can download an ODBC driver from the following page: http://dev.mysql.com/downloads/connector/odbc/3.51.html. Install the downloaded file. If the driver is available on your system, you need to set up a datasource. Go to Control Panel, click on Administrative Tools, and then on the Data Sources (ODBC) icon. Choose the System DSN tab and Add... a new System Data Source (Figure 2). Select the MySQL ODBC 8.0 Unicode Driver from the list and click on Finish.
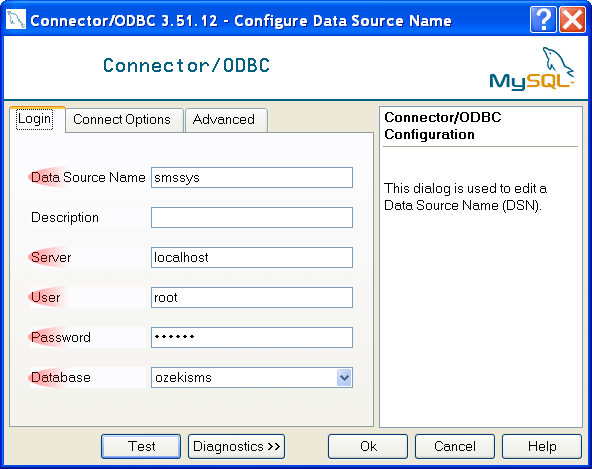
Now configure the datasource at the login tab (Figure 3):
Figure 2 - Creating a new data source
Data Source Name: smssys
Server: localhost
User: root
Password:
Database: ozekisms
Figure 3 - Filling in the Connector/ODBC form
Click on the Test button to test the connection of the datasource. You should get: Success; Connection was made!
Step 5
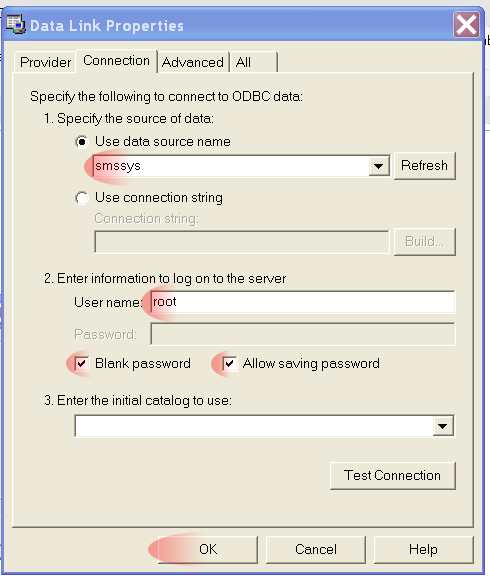
The only thing left to do is to configure the Ozeki Message Server to periodically poll your database. For this, install the Database plugin. To find out how to install it, check out the Database plugin installation page, where you can also find information about the configuration of the plugin. During the configuration, first, you need to click on the Build database connection button in the Connection information tab. In the window you have opened, select the Use Connection String radio button, and then click on Build... In the Provider tab, select Microsoft OLE DB Provider for ODBC Drivers. Click on Next. In the Connection tab (Figure 4), choose smssys in the Use data source name dropdown list. In the User name field, enter root. You can optionally check the two Blank password and Allow saving password checkboxes. When testing the connection, you should get: "Test connection succeeded." Click on OK. (Note: Don't enter anything in the Initial catalog field.)
Figure 4 - Specifying the connection data/figcaption> Click on OK again to create the connection string. The connection will be inserted into the Use connection string field. It will also be inserted into the Build database connection field. Now you have to change the Download new message SQL command in the SQL Templates tab to:
SELECT id,receiver,msg,operator,msgtype,sender,
reference FROM ozekimessageout
WHERE status='send' AND timetosend<NOW();
You don't have to change the other commands. Click on OK, and click on connect at the Database plugin 1. Now you can send scheduled SMS messages by inserting lines into the database.
Testing with the MySQL Command Line Client
You can test scheduled SMS Message sending with your MySQL Command Line Client with the following command:
INSERT INTO ozekimessageout (receiver,msg,timetosend,status)
     VALUES ('+36123456789','test message','2006-11-23 09:13:16','send');
When the Ozeki Message Server sends your SMS message,its status field will change to transmitted and the receivedtime will be set.
More information

 Sign in