- Products
- Ozeki 10
- SMS
- Ozeki 10 SMS gateway
- Ozeki NG SMS Gateway
- SMS protocol converters
- SMS router
- Message Server 6
- On-line manual
- Introduction
- SMS technology
- MMS technology
- About
- Product features
- Installation guide
- Server
- Prerequisites
- Installation steps
- Product Activation
- Server Preferences
- Drivers
- Plugins
- Colour SMS
- Database (SQL)
- ODBC configuration
- Service account
- Microsoft-SQL
- Backward compatibility
- MyODBC driver
- Files
- HTTP Client
- PHP
- POP3/SMTP connection
- POP3
- SMTP
- TCP/IP
- Appstarter
- Autoreply
- Tester
- User accounts
- Upgrade
- Server port
- Clients
- System maintenance
- User guide
- Developers guide
- Case studies
- Appendix
- Download
- Home
- Support
- How to buy
- SMS Wall
- IP SMS Gateway
- Android SMS
- Excel SMS
- Bulk Messenger
- Cluster Software
- Developer tools
- Robots
- Hardware
- Technology
![]() |
On-line manual: |
Explore all the features in this On-line HTML documentation of Ozeki Message Server 6.
| |
![]() |
Product guide: |
Download Ozeki Message Server 6 Manual in PDF format. This PDF guide explains all the features of Ozeki Message Server 6. |
SWITCHING TO USER ACCOUNT
The Ozeki Message
Server service is run by the local system account by default. If you would like
to set up database connectivity, you should change this to a user account. The
account you select here must have an ADO or an ODBC driver or database client
installed and configured. In most cases the Administrator account is the best
option. To change the account used by the Ozeki Message Server follow these
steps:
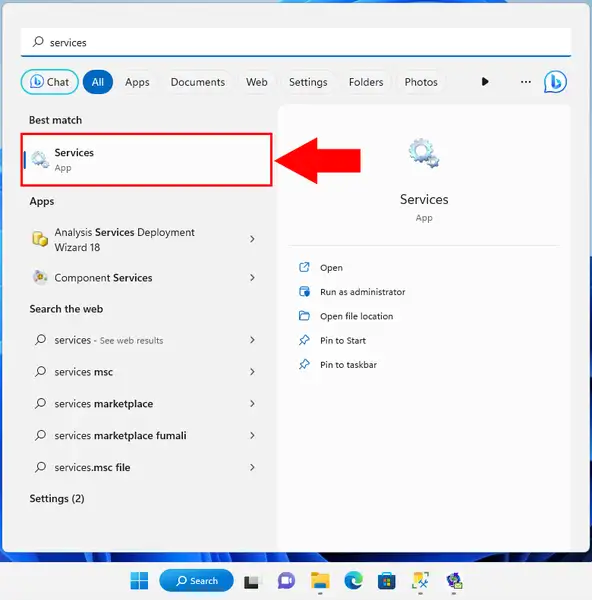
As the first step click on the Start button and select
Control Panel/Administration tools/Services menu (Figure 1).
Figure 1 - Opening the services form
This will
bring up the services form. In the services form, you have to find Ozeki Message
Server Entry (Figure 2). Click on this entry with the right mouse
button, and select the Properties menuitem.
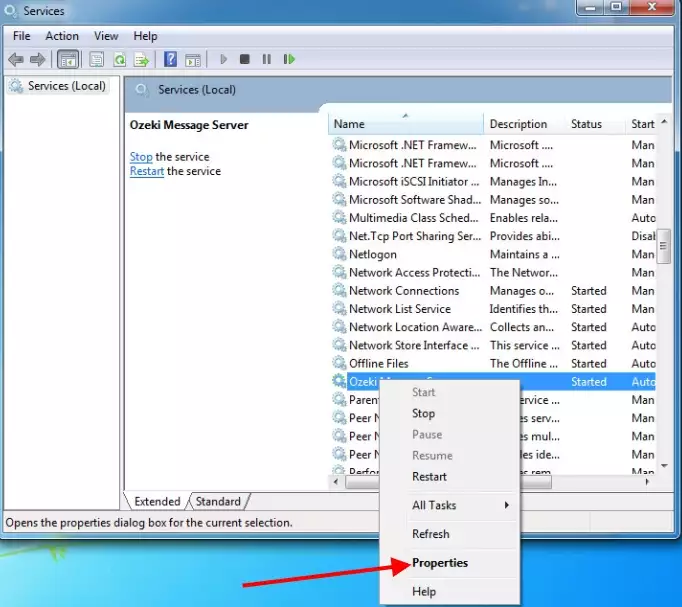
Figure 2 - Services form
On the Ozeki Message Server
Properties form, select the Log on tab (Figure 3.). On this tab
the local system account is set as default, that's why we have to
select the "This accout" radio button, and specify the user name and the
password. When you are finished you should click on the OK
button.
It is recommended to use the administrator
account.
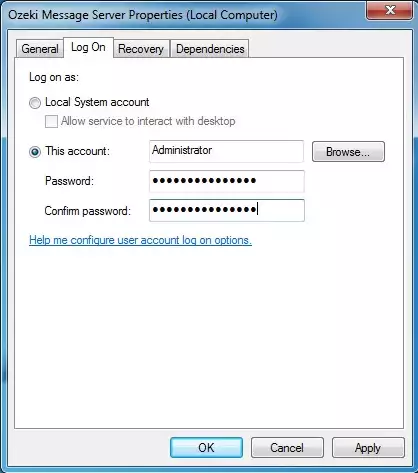
Figure 3 - Configuring the user account
Important:
make sure to restart the service after these settings have been
applied.