
 Sign in

Send and Receive SMS messages from Microsoft Access
In this step-by-step tutorial we explain how to create an Access application, which is capable of sending and receiving SMS messages. In order to use this tutorial, you need an installed copy of Ozeki Message Server and Microsoft Access.

Step 1 - Create an Access database
First you must have a database. You can give it any name. In this example we named it ozeki_ms6_released. In this database you need to create two tables. One of these tables is going to be used for sending SMS messages while the other is going to be used for receiving. It is important that the table used for sending messages is named ozekimessageout and the table used for receiving messages is named ozekimessagein. The columns in the tables should be created as presented on the following screenshot. (Figure 1.) You can add additional columns to both tables, but you cannot change the name of the columns used for sms sending and receiving. You can download this database in Access 2003 format from here: ozeki_ms6_released.mdb (174kb)

Very important: In the ozekimessageout table at the msg Field Size you specify the SMS length. The maximum value is 255 caracters. Ozeki suggest to set this valu to 160. (Figure 1.)
Step 2 - Setting up windows ODBC driver
In order to use Access you need to set up an ODBC connection. Click on Start / Settings /Control Panel / Administrative Tools and click on the "Data Sources" menu item.(Figure 2) .

The following window opens ODBC Data Source Administrator (Figure 3.) select the System DSN (1). The click on Add (2).

On the Create New Data Source form, select the Microsoft Access Driver (1) and click to Finish (2). (Figure 4.)
This brings up ODBC Microsoft Access Setup (Figure 5.) form. Set the Data Source Name to MSAccessSystem (1) write some Desciription (2) Click on Select (3). Open the preveously downloaded file: ozeki_ms6_released.mdb.

Step 2 - Configure OZEKI MESSAGE SERVER to use database connection
This can be done by opening the Plugins menu, select Installed Plugins menuitem from the Message Server menu. (Figure 5.)

When the form is open, select the database plugin to install. (Figure 6 .)

Next click on Configure! (Figure 7.)

If you want to use the database for sending and receiving messages place checkmarks into the Use database for receiving SMS messages and Use database for sending SMS messages checkbox (2,3). Important: place a chechkmark into the Auto connect on startup chechkbox (4). When you start the program the database connection start up automatically.You can create databese connection by clicking on Build database connection (1) (Figure 8.)

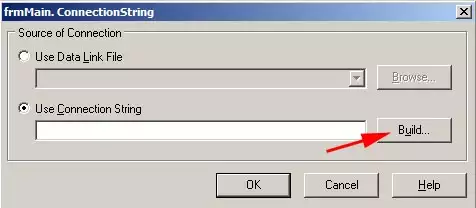
Select the Use Connection String radio button , and click on build (Figure 9.).
In the Data Link Properities window select the Provider tab and select the OLE DB Provider for ODBC Drivers list item from the OLE DB Provider list box(1). Click on next (2).(Figure 10.)

Connection tab will appear , Click the drop down menu and select MSAccessSystem list item (1,2). Remember in the second step we create the Data Source Name: MSAccessSystem (Figure 5). Make sure the User name is Admin (3). Click to Blank password (4) You should test the connection click on Test Connection (5) (Figure 11.)

If the connection is ok you will see: (Figure 12.)

When you setup is correct the next window will appear: At the bottom of the window you can see the log. When the Database connection estabilished Database plugin 1 : select id,receiver,msg,operator text will appear in log.

Sending sms via MS Access
When the server is starts, go to Access and send a message, by inserting a new record into the ozekimessageout table. You must specify the receiver, enter the message in the msg field and set the status to send! (The incoming SMS messages will appear in the ozekimessagein table.)

StartFragment OZEKI SMS allow you to control the SQL queries used to access the data in your Access database. In these versions, you must modify these queries to make things work. Here is what you should do:
Remove the apostrophe around the word $id. ('$id' should be changed to $id)
Here is what you should get after modifying the SQL statements:

More information