How to connect a BMP085 pressure sensor to Arduino
Contents
Introduction
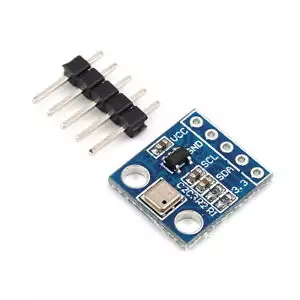
This is a simple breakout board for the BMP085 high-precision, low-power barometric pressure sensor. The BMP085 offers a measuring range of 300 to 1100 hPa with an absolute accuracy of down to 0.03 hPa. It's based on piezo-resistive technology for EMC robustness, high accuracy and linearity as well as long term stability. This sensor supports a voltage supply between 1.8 and 3.6VDC. It is designed to be connected directly to a micro-controller via the I²C bus This breadboard-friendly board breaks out all pins of the BMP085 to a 6-pin 0.1" pitch header. The analog and digital supplies (VDDD and VDDA) of the BMP085 are tied together into a single pin. We've also put two 4.7k pull-up resistors on the I2C lines.
Specification
- Pressure sensing range: 300-1100 hPa (9000m to -500m above sea level)
- Up to 0.03hPa / 0.25m resolution
- -40 to +85°C operational range, +-2°C temperature accuracy
- 2-pin i2c interface on chip
- V1 of the breakout uses 3.3V power and logic level only
- V2 of the breakout uses 3.3-5V power and logic level for more flexible usage
- Digital two wire (I2C) interface
- Wide barometric pressure range
- Flexible supply voltage range
- Ultra-low power consumption
- Low noise measurement
- Fully calibrated
- Temperature measurement included
- Ultra-flat, small footprint
- 0.65 x 0.65" (16.5 x 16.5 mm)

Wiring
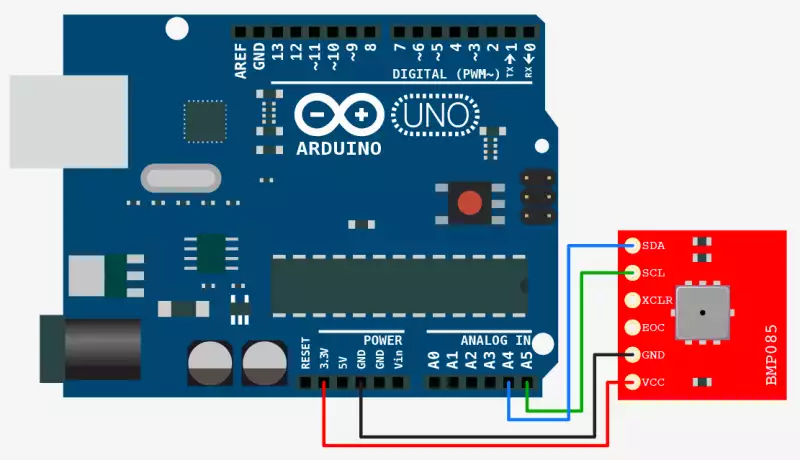
You can see, there are 4 pins you have to use to connect the BMP085 pressure sensor to Arduino. Follow this guide:
| Arduino Pin | BMP085 Pin |
| A4 | SDA |
| A5 | SCL |
| 3,3V | VCC |
| Gnd | GND |
- Connect GND to the ground pin.
- Connect the SCL clock pin to Analog pin #5
- Connect the SDA data pin to Analog pin #4
- Connect the VCC pin to a 3.3V power source.
The V1 of the sensor breakout cannot be used with anything higher than 3.3V so don't use a 5V supply! V2 of the sensor board has a 3.3V regulator so you can connect it to either 3.3V or 5V if you do not have 3V available.
You don’t need to connect the XCLR (reset) or EOC (end-of-conversion) pins.

Code Example
Download the following library and unzip it under the libraries directory of the Arduino IDE folder. For example, for my computer’s setup, the directory is: C:\Users\MyUserName\Documents\Arduino\libraries\ Create a folder for this example, then start the Arduino IDE. You will find the premade library in the file-> examples menu. Open it then run the example.
Download: BMP085 Arduino Library.zip
If you wish to exploit more information eg. temperatue, altitude from your sensor just update the void loop() function in the following way:
void loop(void)
{
  sensors_event_t event;
  bmp.getEvent(&event);

  if (event.pressure)
  {
    Serial.print("Pressure:    ");
    Serial.print(event.pressure);
    Serial.println(" hPa");

    float temperature;
    bmp.getTemperature(&temperature);
    Serial.print("Temperature: ");
    Serial.print(temperature);
    Serial.println(" C");

    float seaLevelPressure = SENSORS_PRESSURE_SEALEVELHPA;
    Serial.print("Altitude:    ");
    Serial.print(bmp.pressureToAltitude(seaLevelPressure,
    event.pressure,
    temperature));
    Serial.println(" m");
    Serial.println("");
  }
  else
  {
    Serial.println("Sensor error");
  }
  delay(1000);
}
