Smart plant watering
Keep the soil wet and healthy for the plants of your smarthome or also fruits and vegetables in your garden.
Ozeki 10 can make your plants independent of rain or even independent of your hard work.
The automatic plant watering system can turn on your water pump if the soil gets too dry. The system can be easily programmed with the Robot Controller application.
The only computer you will need fits in your palm and runs the Ozeki 10 server. This computer can control every electronic component in your house,
including your IP, MJPEG or USB cameras, so you can see how your plants are doing from a sandy beach on the ocean shore.
You can even record rabbits, moles and other animals by motion capturing them with the Camera Recorder application.
You will learn how to build your own plant watering system from just a few components and how to wire the components to an Arduino
Nano which must have a pre-uploaded Plant Watering Code. You will see all steps in the following tutorial.
STEP 1: Acquire plant watering equipment
It is very important to get a Raspberry Pi and a water pump, then an ATmega microcontroller to control the relay for the pump. This microcontroller can measure soil moisture, temperature and humidity.
Required components (camera and DHT 11/22 sensor is optional):
- Raspberry Pi 1/2/3
- Arduino Nano, Uno or Mega
- Soil moisture sensor (soil hygrometer)
- Water pump (submersible or jet pump) with pump switch relay
- Jumper wires and at least 1 USB cable

STEP 2: Wire it according to the circuit diagram
Use the jumper wires and optionally a bread board to test the circuit. By clicking on the circuit below you will see a full scale wiring plan. It assumes that the correct codes are intalled on the microcontroller, which will be installed from STEP 4 through your Windows OS. A USB cable is used between the Arduino and Raspberry Pi and also between the camera and the Pi. It is NOT mandatory to measure air temperature and humidity and it is also not important to use a camera in your garden, but if you use it, you can add both IP or USB cameras with the Ozeki Control Panel. You should know that the most important sensor is the soil moisture sensor, which is an analog sensor. Lower voltage between the legs mean less moisture in the soil, which will turn on the water pump by using a conventional relay.

STEP 3: Install Ozeki to Raspberry Pi
Open the Raspberry Pi desktop by using a HDMI cable. It is essential to download the installer debian package with your Chromium webbrowser from http://www.ozeki.hu/index.php?owpn=231. In any case you have some problem installing Ozeki 10, you can find the Pi installation tutorial on this page: http://www.ozeki.hu/index.php?owpn=5986 This is where to find how to reach the GUI, so you can program the pump with a remote webbrowser.

STEP 4: Download Arduino developer tools
Now you should switch to a Windows machine and stay there. You will use it to upload the microcontroller codes, which can control the pump relay. Please open https://www.arduino.cc and download the Arduino IDE installer for your operating system. Install it. It is good to know that you can install this Arduino IDE to your Raspberry as well, so you can upload codes to ATmega chips from Raspbian. The installer contains all Arduino drivers.

STEP 5: Format microcontroller EEPROM
Ozeki devices need a clean microcontroller EEPROM to store the device ID-s. Upload the EEPROM code you can find on the following page (3110): http://www.ozeki.hu/index.php?owpn=3110. By accessing the serial monitor you can wipe the EEPROM. You can find a detailed video guide on page 3110. To upload any code to your Arduino, the COM port should be free. If Ozeki 10 uses the COM port, the video shows how to free it up for the IDE.

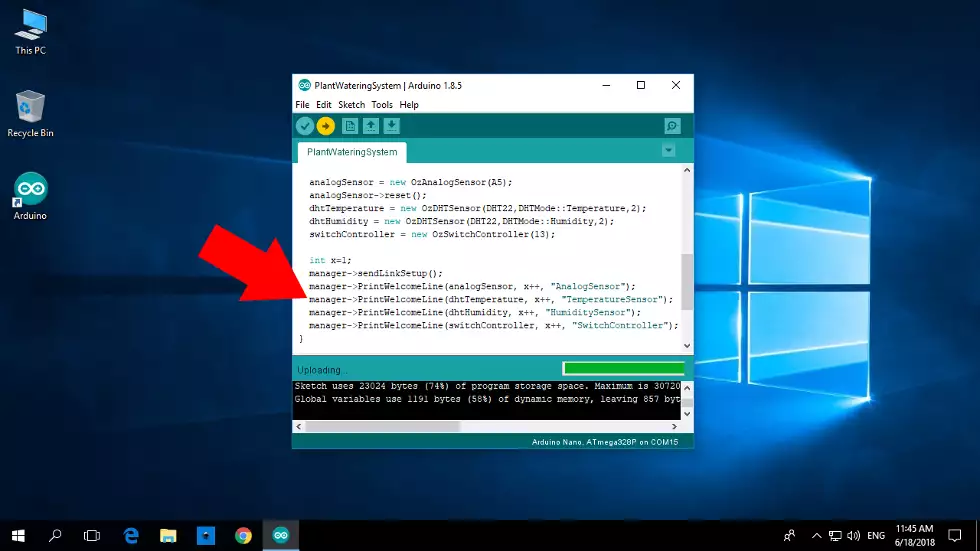
STEP 6: Upload plant watering code
http://www.ozeki.hu/attachments/5958/PlantWatering_code.txt (copy-paste) The Arduino code above is required to control your plant watering system. The soil moisture sensor is connected to A5, the pump relay is connected to D13 and the optional DHT sensor can be wired to D2. If you have used a different kind of wiring from the circuit diagram found in STEP 2, you can modify the pins in the copied text or delete the DHT sensor lines.
Finally the microcontroller code has been properly fitted to your wiring. Please unplug the Arduino and connect it to your Raspberry Pi's USB port with the same wiring technique shown on the circuit diagram in STEP 2. Using jumper wires and a breadboard is highly suggested for your first test. It is good to know that the plant watering system works with Arduino Nano, Mega or Uno too.
STEP 7: Start Snap from desktop
The Ozeki 10 should be running on your Raspberry Pi. If not, you can start it by typing 'service ozeki start' in the Raspbian command line. Go back to your Windows PC and open the Ozeki 10 GUI from your webbrowser by using the server IP and port 9505. Log in with the same credentials used during installation and click the blue robot dog on the Ozeki desktop. Through Snap you can program your watering system with block diagrams.

STEP 8: Download the XML code
If you are a beginner with Ozeki Snap, please download the XML file: http://www.ozeki.hu/attachments/5958/PlantWateringSystem.xml Save it with the right mouse button and selecting 'Save as...' as you can see it on the screenshot below. It can be very useful that Ozeki 10 automatically detects all Arduino devices, like the Analog, Temperature, Humidity and Switch device. Please, continue to STEP 9 to import the XML to Snap.

STEP 9: Import XML to Snap
Remember where you have downloaded the XML file. Click on the grey folder icon in Snap and select 'Import...' Find PlantWateringSystem.xml and open it. Snap can construct the full block diagram from the XML. The code will control your plant watering system. Keep in mind that the XML can contain non-existing Ozeki 10 connections. Change it in the next step.

STEP 10: Block diagram
You can see that the code first subscribes to all connections and can even try non-existing ones. You can easily change them to existing ones from the dropdown menu of each connection by clicking the black arrows. The analog sensor will read soil moisture value from 0 to 1023. The pump relay depends on it. Value 255 opens it if the soil is too dry, while 0 closes it.

STEP 11: Run block diagram code by clicking the green flag

Change the block diagram to your ideas
Hopefully you can see your plant watering system work. The moisture sensor shouldn't fell out of the soil, because it will leave the pump running. It is suggested to keep it sticked in the soil or modify the code. You can change the code, so it can only turn on the pump for a limited period and recheck the analog sensor value again. If the soil is still dry, it stops the pump and do not turns it on until mechanically fixed. Or you can build a system with no moisture sensor by setting a few day time delay before each watering. Just take a walk in the park and plan what you would like to create. By adding temperature and humidity data, you can make assumptions how much water will be needed for your fruits, vegetables or flowers. Keep in mind to save your modified code to XML by clicking 'Export project...' from the top menu. It doesn't matter what kind of code you use, you can always watch your plants grow through camera streams.
USB camera connection tutorial:
http://www.ozeki.hu/index.php?owpn=5928IP camera connection guide:
http://www.ozeki.hu/index.php?owpn=6002More information
- Controlling a garage door using 433 Mhz Remote
- Plant watering using soil moisture sensor
- Controlling RGB lights using your voice
- Controlling smart devices using a 433 Mhz transmitter
- Controlling door access using RFID, NFC tags
- Scheduled power off
- Creating a 433 Mhz smart alarm system
- Automated shade control
- Creating a VoIP door phone
- Creating an IP camera system
- License plate recognition
- Remote Controlled LED Lightbulbs