Voice activated RGB lights
You will see how to implement a voice controlled RGB LED strip. The color and brightness can be controlled with your own voice. Do not forget a 12V supply to make the strip glow on a 24 bit color scale. It will shape your company, room or night flowers in your garden to your style, but if you think more extreme, create colorful bicycle wheels. Say it to change it. Sounds exciting, isn't it? Let's see how it works in the simplest model you can build! Later on, think of improving your life with it.
STEP 1: What to buy... look around for these parts
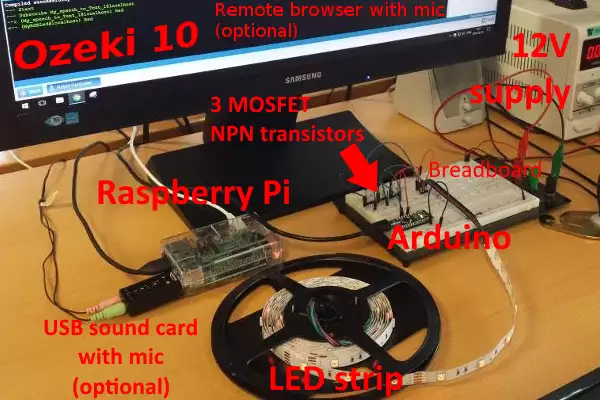
Look around your home for the following components. If you cannot find all of them, look for the rest of the parts on the internet.- Raspberry Pi 2 or 3
- Ozeki 10 installed on your Raspberry Pi
- Microphone connected to one of the following
- another machine (remote webbrowser as seen in this tutorial)
- USB sound card, which is connected to your Pi (picture below)
- Arduino Nano with a Mini USB cable
- 3 MOSFET NPN transistors
- LED strip
- Breadboard
- Minimum 12 jumper wires
- 12V Power supply
STEP 2: How to wire the RGB strip to an Arduino
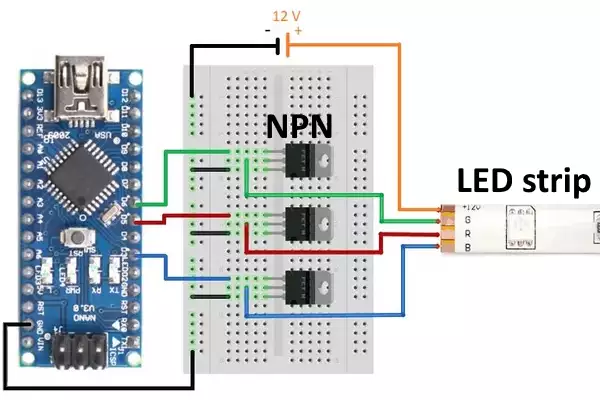
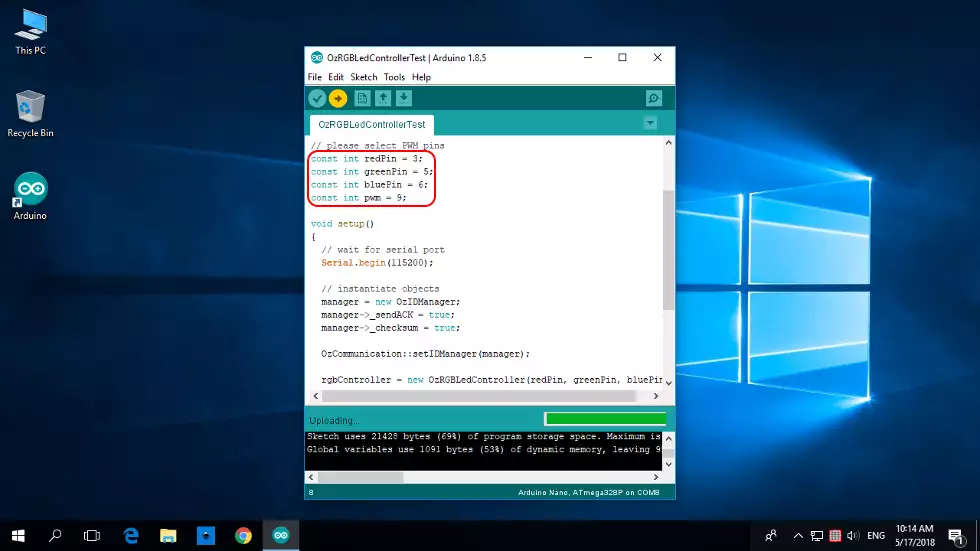
Look at the following circuit and think of the possibilities of controlling the LED strip with an Arduino Nano, Mega or Uno. The open source codes were written for ATmega chips, which makes them work on all Arduinos, although you can rewrite the codes for your own microcontroller architecture. But all together it is highly suggested to use Arduinos. The wiring diagram below gives you a great help to connect the electronic components. The output pins for the three base colors are D5 red, D6 green and D3 for blue, but you can modify the pins by rewriting 3 variables in the code. Connect each of these pins to a MOSFET NPN transistor. You will need 3 transistors for all 3 colors, as you can see it below. The LED strip is powered from a 12V DC independent power source. The Arduino is powered through an USB port found on your Raspberry Pi. For this you will need an USB mini cable. Keep in mind to connect all electronic parts on a common GND with black wires, which is an international standard.
STEP 3: Connect parts and plug it in
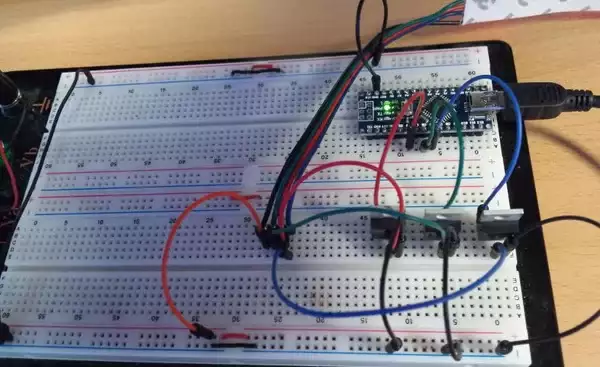
As you can see this is how it looks after creating the wiring. It is such easier to connect the components on a breadboard with jumper wires, then creating an electronic circuitboard. Keep in mind that circuitboards are harder to create, but they require less space. If you have designed one, it is easier to mass produce it as well. Back to the breadboard below, look at the black cables. See that all of them are connected on a common ground, which is called GND. The 12V DC power supply is not on the picture, but you can see the Arduino plugged in with USB and getting 5V -s. The Arduino and Ozeki 10 is connected through the USB serial protocol.
STEP 4: Install Ozeki 10 on your Raspberry Pi
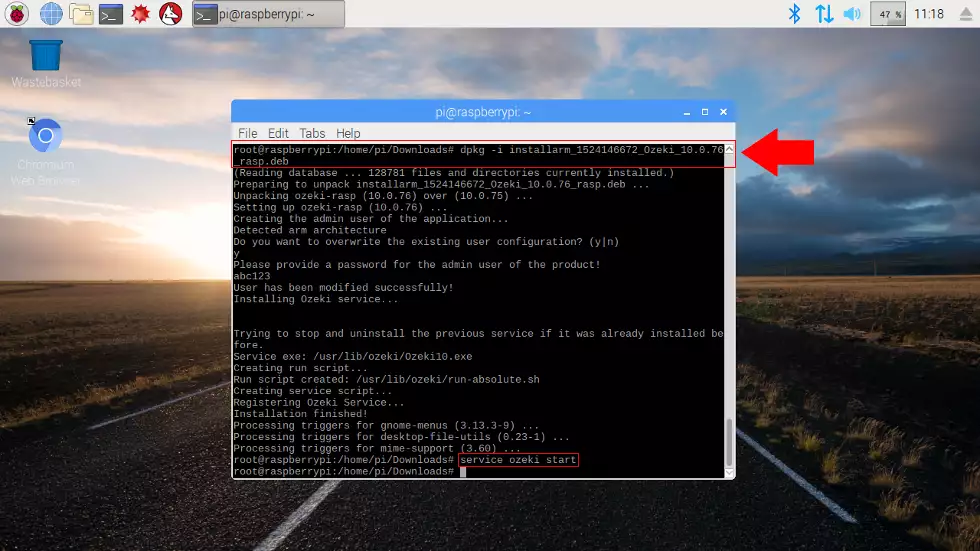
Plug your Raspberry Pi into a HDMI monitor, so you can use the graphical user interface of the pre-installed Raspbian OS. In the Ozeki 10 guide there is a great tutorial at http://www.ozeki.hu/index.php?owpn=5986 which teaches how to install Ozeki 10 to your Raspbian. It is not as simple as downloading the package and installing it, since you have to install a few other components as well. This is described in details on the 5986 website. After finally installing Ozeki and starting the Ozeki 10 service as you can see it on the screenshot below, you can follow up on this tutorial. Choose from doing it from the Raspberry Pi GUI or from a remote browser.
STEP 5: Download and install an Arduino IDE
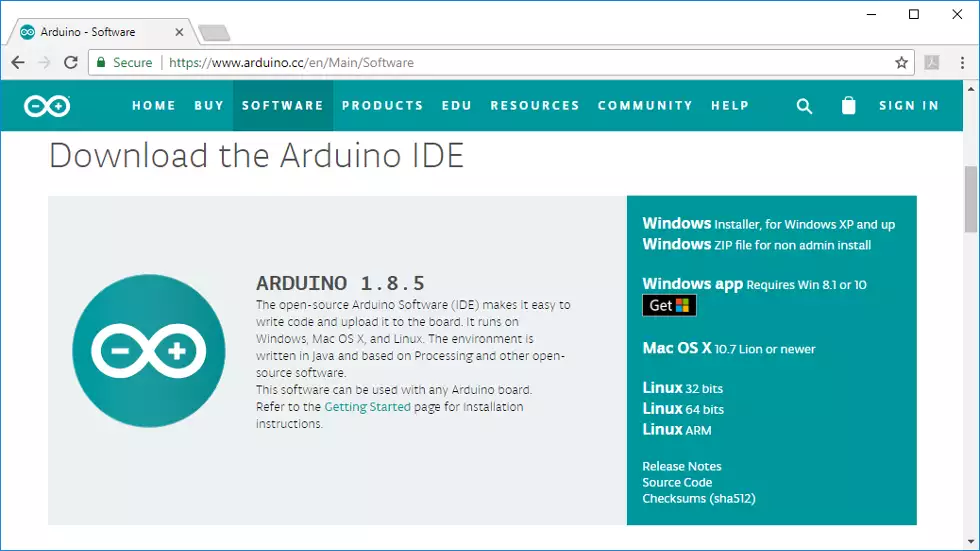
Now let's get to a Windows operating system to download the Arduino IDE. You can do it with a Mac, Raspbian or any other Linux distribution as well. Look at the picture below to find the operating system of your choice. This will be the operating system used for installing the microcontroller codes on your Arduino. This is what makes the colors reality. It is what directly controls the RGB LED strip. You can download the Arduino ID from
https://www.arduino.cc/
STEP 6: Fast EEPROM formatting
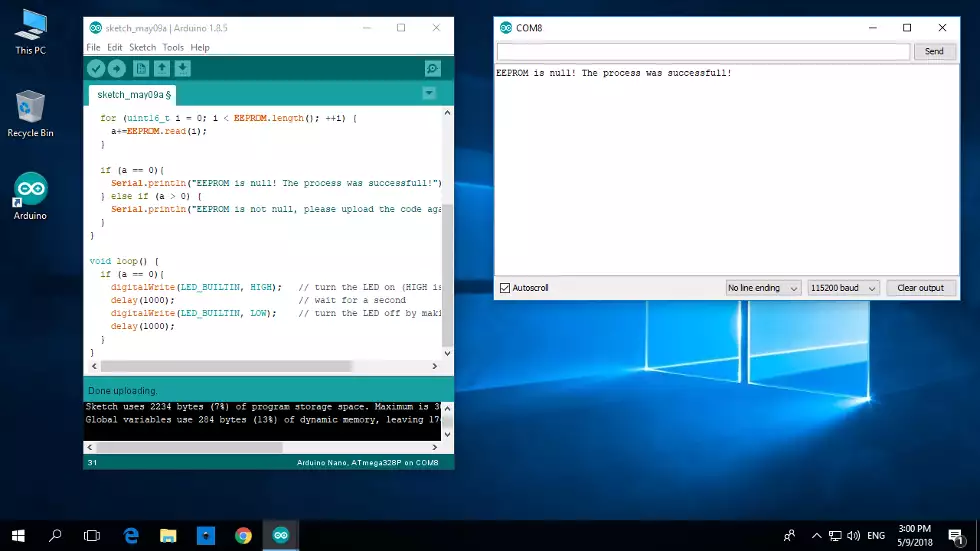
But before doing the miracles, please clean the EEPROM with the following code http://www.ozeki.hu/index.php?owpn=3110 It creates plenty of space to store the device IDs of each sensor, heater, LED or moving component. On page 3110 you can see a detailed video tutorial demonstrating how to format the EEPROM. Wiping it clean is highly recommended before uploading Ozeki device codes to your Arduino. It can happen that the serial communication cannot be established if not cleaned.
STEP 7: Uploading the code
To acquire the Ozek 10 open source Arduino codes, the best idea is to download Ozeki 10 to Windows, so you can easily find the RGB code at
C:\Users\User\Documents\Arduino\libraries\or if you use the Linux version of the Arduino IDE, you can find the code at
OzRgbLedController\OzRGBLedControllerTest
/usr/share/arduino/libraries/
OzRgbLedController/OzRGBLedControllerTest
STEP 8: Start Control Panel after logging in
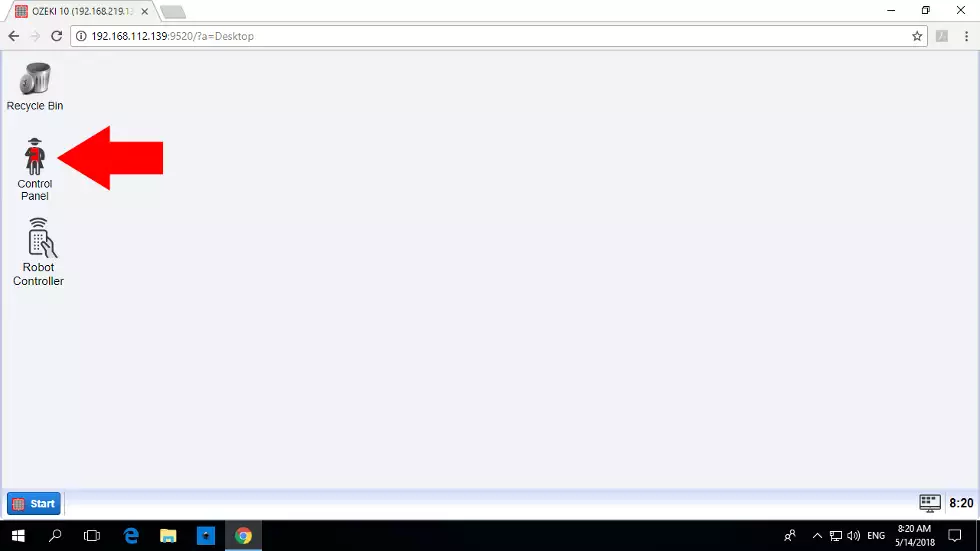
The Ozeki 10 service should be running on your Raspberry since STEP 4. Please check the IP address of your Raspberry, so you can type the URL in any remote webbrowser, which leads you to the Ozeki 10 GUI. The port number for the Ozeki 10 service is 9505. In this tutorial a Windows 10 operating system is used for logging in. It is a great solution with a Google Chrome browser, which is advised for a remote microphone applications like this one. After you have successfully logged in with the admin credentials you have provided during the Raspbian installation, please start the Control Panel to create and manage connections like the RGB LED or the browser speech to text engine as well. Control Panel is the place where you should start. Click the red Napoleon icon to begin your journey.
STEP 9: Setup automatic serial port connection in the Control Panel
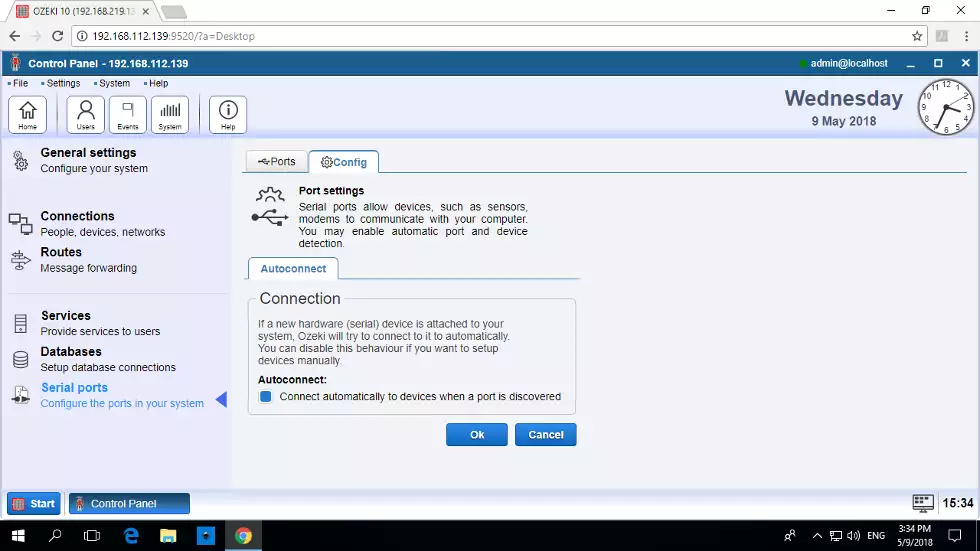
At first you will not see the RGB LED connection on the list, so please activate autoconnection. Next time all Arduino devices will appear on the list. This is why autoconnect should be turned ON if you are building your own robot. On the left side toolbar, you will see a 'Serial Ports' icon that will show you all COM ports connected, but only the green ones are recognised by Ozeki 10. Switch the tabpage to 'Config', tick the 'Autoconnect' checkbox and click 'Ok' to save settings. Turn on the COM port of the RGB device.
STEP 10: RGB strip connected to Ozeki 10
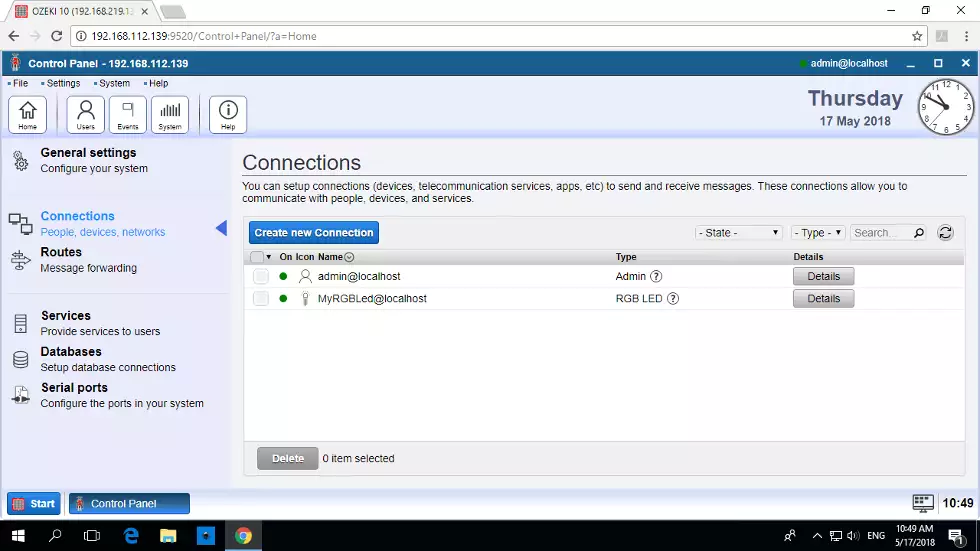
On the left toolbar select the 'Connections' tabpage and you will find yourself on the current list of Ozeki 10 connections. Now there is only two important connections you'll need. The RGB LED connection of course and the browser speech to text engine connection as well. At the very moment you can only see the RGB device connection. The green LED next to each connections shows if they are online and can send or receive messages. The Ozeki 10 messaging engine is responsable for all required transfers.
STEP 11: Configure Speech to Text
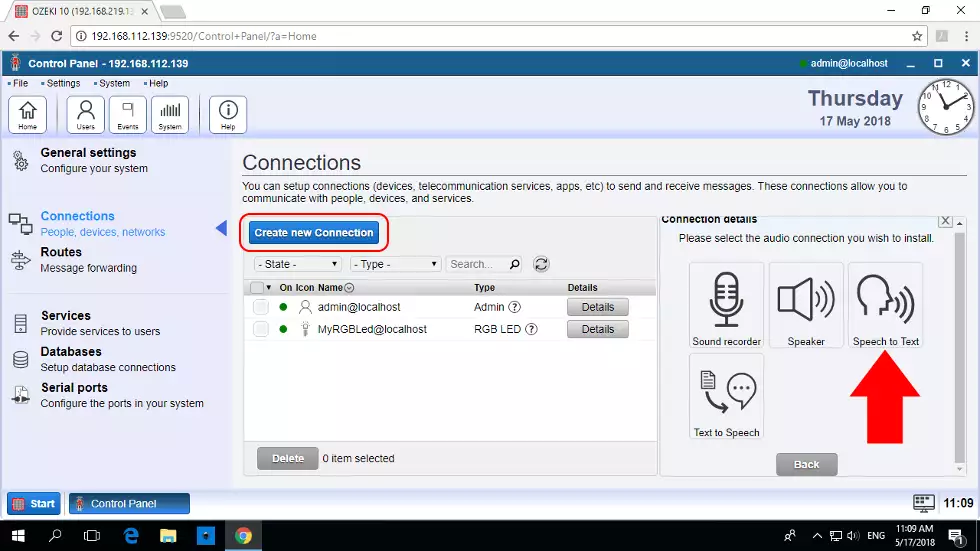
Please click on 'Create new Connection' to add the browser connection that converts speech to text. First click 'Audio' then click 'Speech to Text' as you can see below and select 'Browser'. On the config form leave the device name 'My_speech_to_Text_1' and disable tray notifications, because it can be annoying to have popup windows, but if you wish you can test it and disable it later on. The accuracy level is 30, which means that the converter accepts the word if it is at least 30% sure. It can easily detect colors, so you can set it to 70. This way the LED will not change red by saying 'rat'.
STEP 12: Set word set
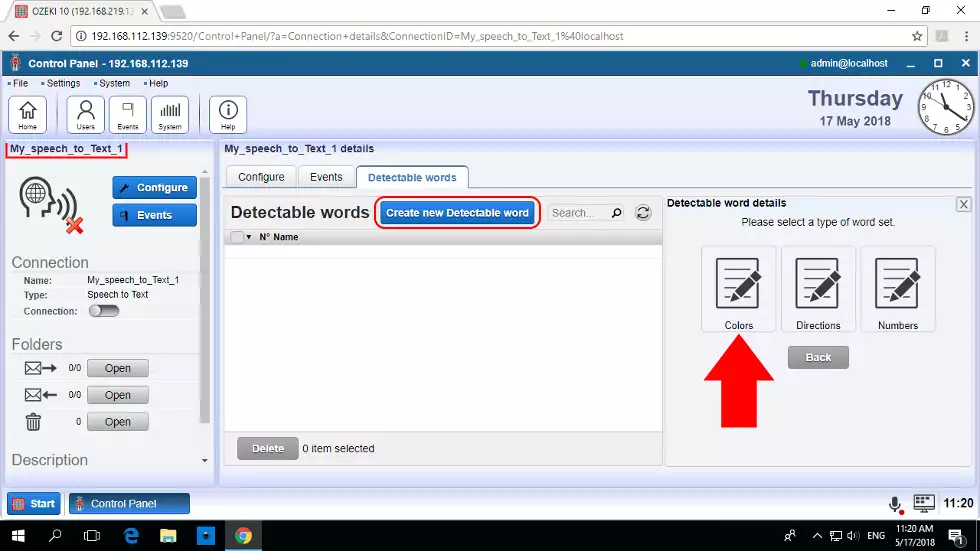
After saving your new 'Speech to Text' connection by clicking 'Ok', you will see it appear in the connection list. The green dot left to it means that the connection is online, although it is important that it won't recognise other words than colors, so please set it by clicking 'Details' just right to the connection. It is a fact that all connections have a details page. Select the 'Detectable words' tabpage on the top and follow the screenshot by clicking on the long blue 'Create new Detectable word' button then click 'Word set' and choose 'Colors' like below. Click 'Ok' to approve the word set.
STEP 13: Start Robot Controller
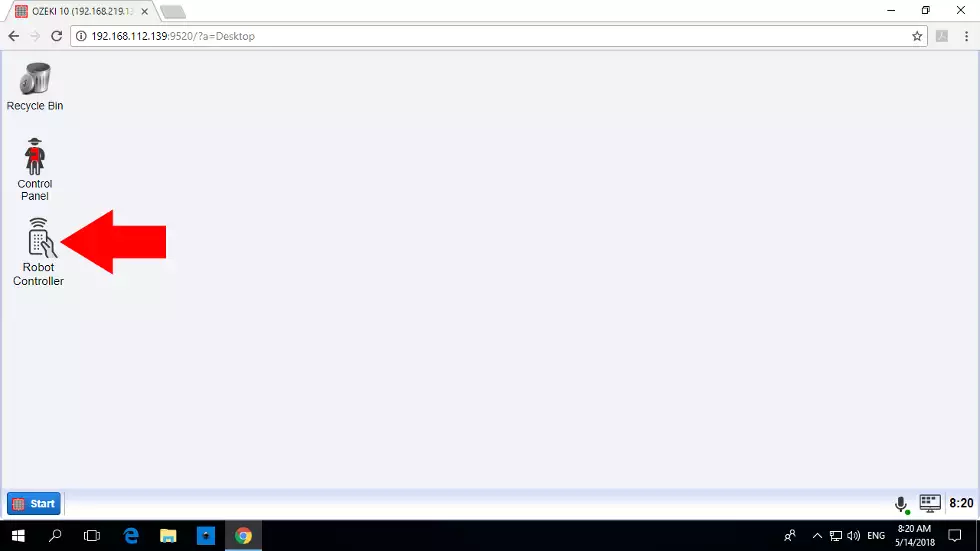
Now you can close the Control Panel with the 'X' and open the Robot Controller application. You will find a remote controller icon on Ozeki 10's desktop GUI, please click it. In the final STEP of this tutorial a code is going to forward any color detected by the speech to text connection to the RGB LED device. The Control Panel can route messages as well, but Robot Controller is highly recommended for sophisticated tasks like this one.
STEP 14: Run code on Robot Controller
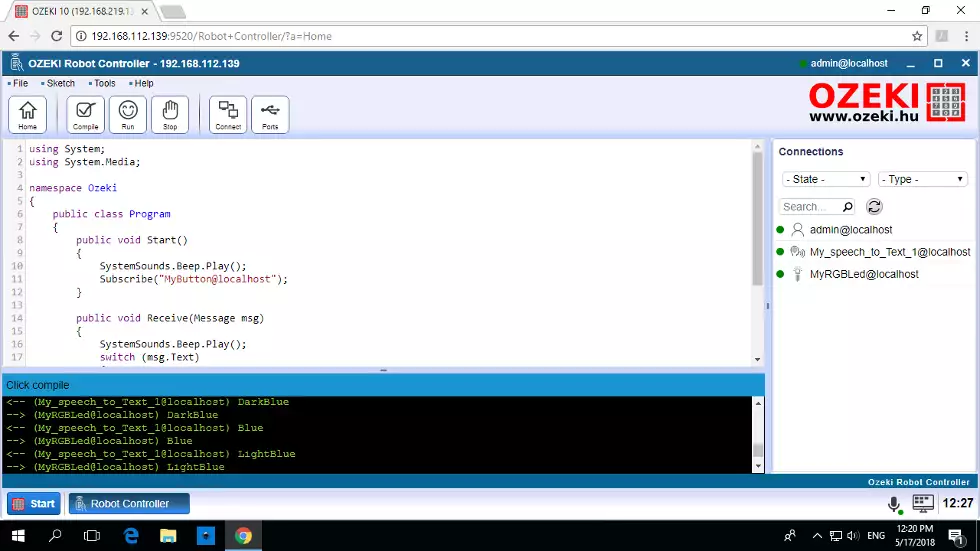
You can find and copy paste the required code from the bottom of http://www.instructables.com/id/RGB-LED-Strip-Controlled-by-Voice/. All the device names in the code are equal to the device names you have created in this tutorial, so the code should perfectly match and easily work. Please press 'Compile' to see if the syntax is correct and then press 'Run' to try it. You can see it working by looking at the green text log in the screenshot.
