How to connect the DHT11 temperature and humidity sensor to Arduino
Contents
- Picture
- Specifications
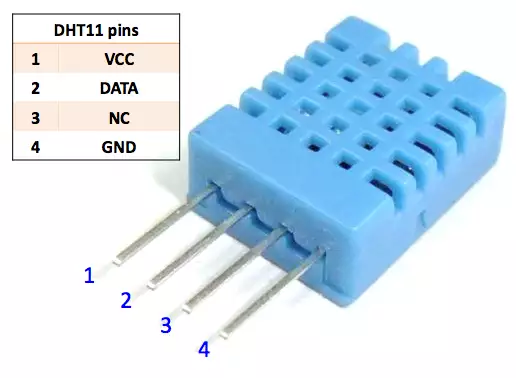
- Pin assignment
- Wiring
- Installation
- Example code
- Communication Process: Serial Interface
- References
The sensor itself

Specifications
- Humidity measuring range: 20%~90%RH(0-50℃temperature compensation).
- Temperature measuring range: 0~+50℃.
- Humidity measurement accuracy: ±5.0%RH.
- Temperature measurement accuracy: ±2.0℃.
- Response time: <5s.
- Low power consumption.
- Size:2.3cm x 1.2cm x 0.5cm.
Pin assignment
DHT11’s power supply is 3-5.5V DC. When power is supplied to the sensor, do not send any instruction to the sensor in within one second in order to pass the unstable status. One capacitor valued 100nF can be added between VDD and GND for power filtering.
| Pin | Name | Description |
| 1 | VDD | Power supply 3 – 5.5 V DC |
| 2 | DATA | Serial data output |
| 3 | NC | Not connected |
| 4 | GND | Ground |
Wiring
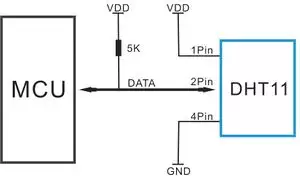
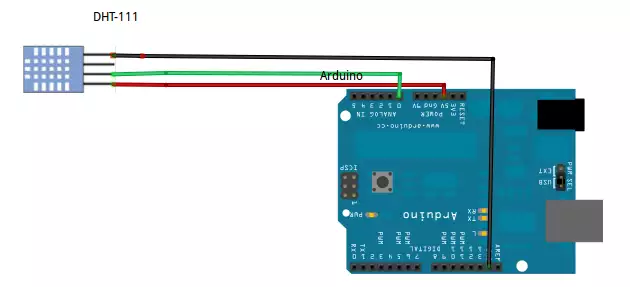
Connect the sensor to the Arduino as shown below (optionally add a pullup resistor).

In a typical application a pull up resistor is recommended to control line state. 3Pin – Null; MCU = Micro-computer Unit (Arduino). When the connecting cable is shorter than 20 metres, a 5K pull-up resistor is recommended; when the connecting cable is longer than 20 metres, choose a appropriate pull-up resistor as needed.

Installation
Download the DHT library and unzip it under the libraries directory of the Arduino IDE folder. For example, for my computer’s setup, the directory is C:\Users\MyUserName\Documents\Arduino\libraries. After copying files across, the directory C:\Users\MyUserName\Documents\Arduino\libraries\DHT should have the following two files: dht.h and dht.cpp
Download: dht.zip
Example code
/* YourDuino.com Example Software Sketch
   DHT11 Humidity and Temperature Sensor test
   Credits: Rob Tillaart
   terry@yourduino.com */

/*-----( Import needed libraries )-----*/
#include <dht11.h>

/*-----( Declare objects )-----*/
dht11 DHT11;

/*-----( Declare Constants, Pin Numbers )-----*/
#define DHT11PIN 2

void setup()   /*----( SETUP: RUNS ONCE )----*/
{
   Serial.begin(9600);
   Serial.println("DHT11 TEST PROGRAM ");
   Serial.print("LIBRARY VERSION: ");
   Serial.println(DHT11LIB_VERSION);
   Serial.println();
}/*--(end setup )---*/

void loop()   /*----( LOOP: RUNS CONSTANTLY )----*/
{
   Serial.println("\n");

   int chk = DHT11.read(DHT11PIN);

   Serial.print("Read sensor: ");
   switch (chk)
   {
       case 0: Serial.println("OK"); break;
       case -1: Serial.println("Checksum error"); break;
       case -2: Serial.println("Time out error"); break;
       default: Serial.println("Unknown error"); break;
   }

   Serial.print("Humidity (%): ");
   Serial.println((float)DHT11.humidity, 2);

   Serial.print("Temperature (oC): ");
   Serial.println((float)DHT11.temperature, 2);

   Serial.print("Temperature (oF): ");
   Serial.println(Fahrenheit(DHT11.temperature), 2);

   Serial.print("Temperature (K): ");
   Serial.println(Kelvin(DHT11.temperature), 2);

   Serial.print("Dew Point (oC): ");
   Serial.println(dewPoint(DHT11.temperature, DHT11.humidity));

   Serial.print("Dew PointFast (oC): ");
   Serial.println(dewPointFast(DHT11.temperature, DHT11.humidity));

   delay(2000);
}/* --(end main loop )-- */

/*-----( Declare User-written Functions )-----*/
//
//Celsius to Fahrenheit conversion
double Fahrenheit(double celsius)
{
       return 1.8 * celsius + 32;
}

//Celsius to Kelvin conversion
double Kelvin(double celsius)
{
       return celsius + 273.15;
}

// dewPoint function NOAA
// reference: http://wahiduddin.net/calc/density_algorithms.htm
double dewPoint(double celsius, double humidity)
{
       double A0= 373.15/(273.15 + celsius);
       double SUM = -7.90298 * (A0-1);
       SUM += 5.02808 * log10(A0);
       SUM += -1.3816e-7 * (pow(10, (11.344*(1-1/A0)))-1) ;
       SUM += 8.1328e-3 * (pow(10,(-3.49149*(A0-1)))-1) ;
       SUM += log10(1013.246);
       double VP = pow(10, SUM-3) * humidity;
       double T = log(VP/0.61078);   // temp var
       return (241.88 * T) / (17.558-T);
}

// delta max = 0.6544 wrt dewPoint()
// 5x faster than dewPoint()
// reference: http://en.wikipedia.org/wiki/Dew_point
double dewPointFast(double celsius, double humidity)
{
       double a = 17.271;
       double b = 237.7;
       double temp = (a * celsius) / (b + celsius) + log(humidity/100);
       double Td = (b * temp) / (a - temp);
       return Td;
}

/* ( THE END ) */
Communication Process: Serial Interface
Single-bus data format is used for communication and synchronization between MCU and DHT11 sensor. One communication process is about 4 ms. Data consists of decimal and integral parts. A complete data transmission is 40 bit, and the sensor sends higher data bit first. Data format: 8 bit integral RH data + 8 bit decimal RH data + 8bit integral T data + 8 bit decimal T data + 8bit check sum. If the data transmission is right, the check-sum should be the last 8bit of “8bit integral RH data + 8bit decimal RH data + 8bit integral T data + 8 bit decimal T data”.

When MCU sends a start signal, DHT11 changes from the low-power-consumption mode to the running-mode, waiting for MCU completing the start signal. Once it is completed, DHT11 sends a response signal of 40-bit data that include the relative humidity and temperature information to MCU. Users can choose to collect (read) some data. Without the start signal from MCU, DHT11 will not give the response signal to MCU. Once data is collected, DHT11 will change to the lowpower-consumption mode until it receives a start signal from MCU again.
