How to connect a TMP36 temperature sensor to Arduino
Contents
- Introduction
- Specification
- About the sensor
- Pin assignment
- Reading the Analog Temperature Data
- Example code
- References
Introduction
The TMP36 is an analog temperature sensor. With this chip you can measure what the ambient temperature is! These sensors use a solid-state technique to determine the temperature. They use the fact as that temperature increases, the voltage across a diode increases at a known rate. (Technically, this is actually the voltage drop between the base and emitter - the Vbe - of a transistor.) By precisely amplifying the voltage change, it is easy to generate an analog signal that is directly proportional to the temperature. These Arduino sensors are one of the best tools to measure temperature because they are stable (no moving parts), precise and never wear out. It is easy to be consistant between sensors and reading in many enviromental conditions and there is no need for extra calibration. Moreover, beginners can use it too, because it is cheap and easy to assemble.
Specification
- Size: TO-92 package (about 0.2" x 0.2" x 0.2") with three leads
- Temperature range: -40°C to 150°C / -40°F to 302°F
- Output range: 0.1V (-40°C) to 2.0V (150°C) but accuracy decreases after 125°C
- Power supply: 2.7V to 5.5V only, 0.05 mA current draw
- 10 mV/°C scale factor (20 mV/°C on TMP37)
- ±2°C accuracy over temperature (typ)
- ±0.5°C linearity (typ)
- Stable with large capacitive loads
- Less than 50 μA quiescent current
- Shutdown current 0.5 μA max
About the sensor
Another great news for beginners! The chips of these sensors are solid and not that delicate so they do not need to be handled carefully. Also please pay attention to static electricity. Connect the sensor correctly to Arduino and supply it between 2.7 – 5.5V DC.

Pin assignment
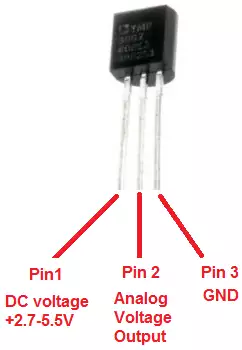
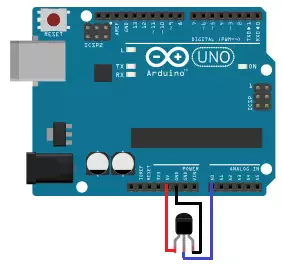
Using the TMP36 is very easy, simply connect the left pin to power (3,3V or 5V) and the right pin to ground (GND). Then the middle pin will have an analog voltage that is directly proportional (linear) to the temperature. The TMP36 doesn't act like a resistor. Because of that, there is really only one way to read the temperature value from the sensor, and that is plugging the output pin directly into an Analog (A0) input. The analog voltage is independant of the power supply.

Reading the Analog Temperature Data
If you're using a 5V Arduino, and connecting the sensor directly into an Analog pin, you can use these formulas to turn the 10-bit analog reading into a temperature:
Voltage at pin in milliVolts = (reading from ADC) * (5000/1024)
This formula converts the number 0-1023 from the ADC into 0-5000mV (= 5V)
If you're using a 3.3V Arduino, you'll want to use this:
Voltage at pin in milliVolts = (reading from ADC) * (3300/1024)
This formula converts the number 0-1023 from the ADC into 0-3300mV (= 3.3V)
Then, to convert millivolts into temperature, use this formula:
Centigrade temperature = [(analog voltage in mV) - 500] / 10
Example code
This example code for Arduino shows a quick way to create a temperature sensor, it simply prints to the serial port what the current temperature is in both Celsius and Fahrenheit.
int sensorPin = 0;
void setup()
{
  Serial.begin(9600);
}

void loop()
int reading = analogRead(sensorPin);
float voltage = reading * 5.0;
voltage /= 1024.0;
Serial.print(voltage); Serial.println(" volts");
float temperatureC = (voltage - 0.5) * 100 ;
Serial.print(temperatureC); Serial.println(" degrees C");
float temperatureF = (temperatureC * 9.0 / 5.0) + 32.0;
Serial.print(temperatureF); Serial.println(" degrees F");
delay(1000);
}
