How to connect an NFC reader to Arduino
Contents
Introduction
Near field communication (NFC) is a set of standards for smartphones and similar devices to establish radio communication with each other by touching them together or bringing them into
close proximity, usually no more than a few centimeters.
With this inexpensive and easy to use device you can bear any kind of information you wish to use stored even a keyring or a card.
Specification
- Gilt PCB
- Work in NFC Mode or RFID reader/writer Mode
- RFID reader/writer supports:
- Mifare 1k, 4k, Ultralight, and DesFire cards
- ISO/IEC 14443-4 cards such as CD97BX, CD light, Desfire, P5CN072 (SMX)
- Innovision Jewel cards such as IRT5001 card
- FeliCa cards such as RCS_860 and RCS_854
- Plug and play, Arduino compatible
- Built in PCB Antenna, with 4cm~6cm communication distance
- On-board level shifter, Standard 5V TTL for I2C and UART, 3.3V TTL SPI
- Work as 1443-A card or a virtual card
- Exchange data with other NFC devices such as smartphone
- Weight: 0.0625 lbs
- Dimensions: 4.5 x 3 x .125 inch
- The PN532 board with integrated NFC loop antenna
- 4 jumper wires, 6 inches (15cm) long
- A 4 pin and an 8 pin angled header
- An on-board level shifter for 3.3v SPI and 5v I2C & Uar
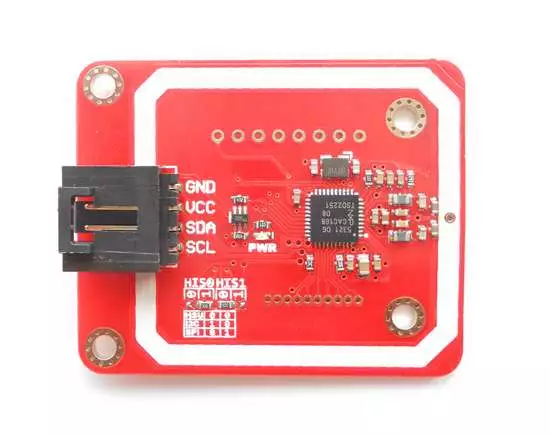
Wiring
You can use your NFC shield by attaching a sensor shield to your Arduino board.
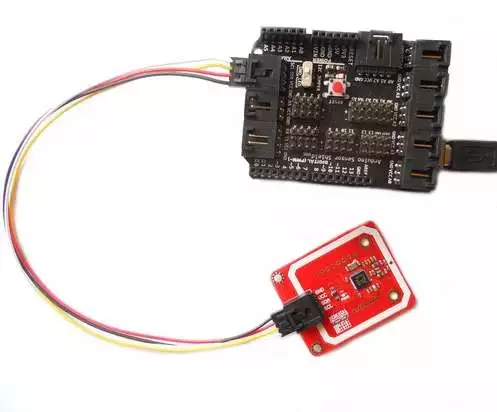
If you wish to connect the device directly to the Arduino board you have to follow the following pin assignment:
| Arduino | PN532 Module |
| GND | GND |
| 5V | VCC |
| A4 SDA | SDA |
| A5 SCL | SCL |
Code Example
- Download zip file: PN532 NFC Arduino example.zip
- Extract the three folders(PN532, PN532_SPI, PN532_HSU and PN532_I2C) into libraries of Arduino.
- Follow the examples of the PN532 library
RDFI Reader / Writer function
/** include library */
#include "Wire.h"
#include "nfc.h"
/** define an nfc object
*/
NFC_Module nfc;
void setup(void)
{
Serial.begin(9600);
nfc.begin();
Serial.println("MF1S50 Reader Demo From Elechouse!");
uint32_t versiondata = nfc.get_version();
if (! versiondata) {
Serial.print("Didn't find PN53x board");
while (1); // halt
}
// Got ok data, print it out!
Serial.print("Found chip PN5");
Serial.println((versiondata>>24) & 0xFF, HEX);
Serial.print("Firmware ver. ");
Serial.print((versiondata>>16) & 0xFF, DEC);
Serial.print('.');
Serial.println((versiondata>>8) & 0xFF, DEC);
/** Set normal mode, and disable SAM */
nfc.SAMConfiguration();
}
void loop(void)
{
u8 buf[32],sta;
/** Polling the mifar card, buf[0] is the length of the UID */
sta = nfc.InListPassiveTarget(buf);
/** check state and UID length */
if(sta && buf[0] == 4){
/** the card may be Mifare Classic card, try to read the block */
Serial.print("UUID length:");
Serial.print(buf[0], DEC);
Serial.println();
Serial.print("UUID:");
nfc.puthex(buf+1, buf[0]);
// print out the UID
Serial.println();
/** factory default KeyA: 0xFF 0xFF 0xFF 0xFF 0xFF 0xFF */
u8 key[6] = {0xFF, 0xFF, 0xFF, 0xFF, 0xFF, 0xFF};
u8 blocknum = 4;
/** Authentication block 4 */
sta = nfc.MifareAuthentication(0, blocknum, buf+1, buf[0], key);
if(sta){
/** create array to save block data read from the card
*/
u8 block[16];
Serial.println("Authentication success.");
/***********************************************************
The following are examples to write data to RFID card. To
protect user
’
s data in RFID card. By Default we disabled it.
Please remove the annotation symbol to enable it
***********************************************************/
/*
strcpy((char*)block, "Elechou
se
- NFC");
sta = nfc.MifareWriteBlock(blocknum, block);
if(sta){
Serial.println("Write block successfully:");
}
*/
/***********************************************************
The following are examples to read data from RFID card.
***********************************************************/
/** read block 4 */
sta = nfc.MifareReadBlock(blocknum, block);
if(sta){
Serial.println("Read block successfully:");
nfc.puthex(block, 16);
Serial.println();
}
/** read block 5 */
sta = nfc.MifareReadBlock(blocknum+1, block);
if(sta){
Serial.println("Read block successfully:");
nfc.puthex(block, 16);
Serial.println();
}
/** read block 6 */
sta = nfc.MifareReadBlock(blocknum+2, block);
if(sta){
Serial.println("Read block successfully:");
nfc.puthex(block, 16);
Serial.println();
}
/** read block 7 */
sta = nfc.MifareReadBlock(blocknum+3, block);
if(sta){
Serial.println("Read block successfully:");
nfc.puthex(block, 16);
Serial.println();
}
}
}
}
- Upload the code to Arduino, and then open the Serial Monitor on Arduino IDE
- Put the card above the antenna.
- You are uploaded the data to your card.
Or you can use a premade example.
- Open the iso14443a_uid example in the Arduino IDE.
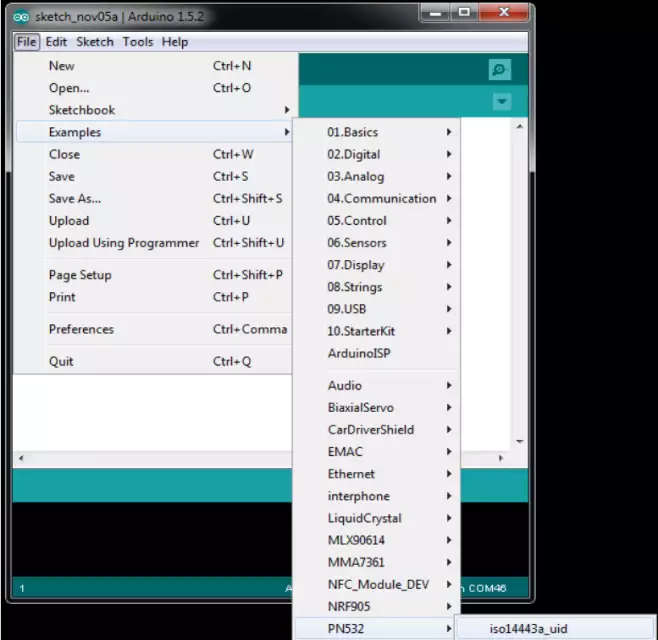
Figure 3 - Open the example - Modify the code
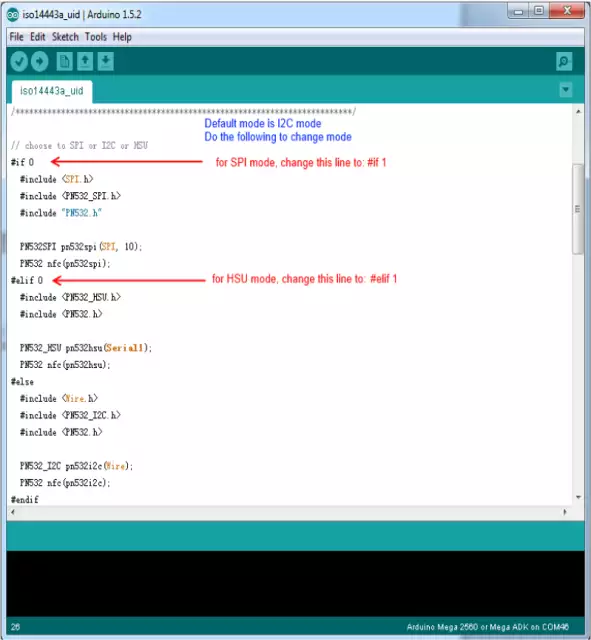
Figure 4 - How to change the code - Upload the code to Arduino and open Serial monitor. Put a card on it.
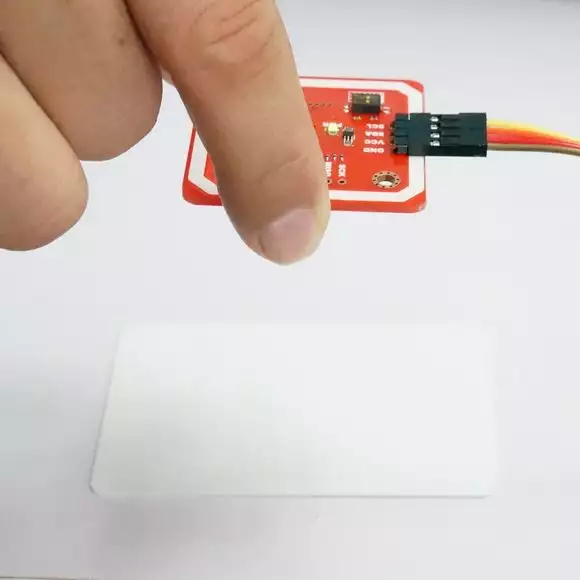
Figure 4 - Send the data to the card
Dig deeper
If you are looking for detailed information read the PN532 NFC's user guide: PN532 NFC User Guide.pdf
