Connecting Ozeki SMS clients to Message Server 6 over the network
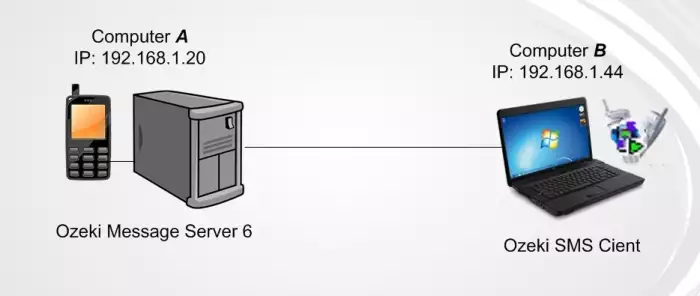
In most situations Ozeki Message Server 6 will be installed on a server computer (Computer "A") and the Ozeki SMS Client will be installed on a different computer in the network (Computer "B"). Figure 1 illustrates this architecture. In this setup the two computers communicate through TCP/IP, so each computer has an IP Address. The IP address of computer "A" is 192.168.1.20. The IP address of computer "B" is 192.168.1.44.

Step 1.) Enable incoming connections for Message Server 6 on the firewall of Computer "A"
Step 2.) Create a user account in Message Server 6 on Computer "A"
Step 3.) Configure the newly created user account in Ozeki SMS Client on Computer "B"
Step 1. - Enable incoming connections for Message Server 6 on the firewall of Computer "A"
To enable incoming network connections for Ozeki Message Server 6 in your firewall, please follow the instructions on our "firewall configuration guidelines" page.
Step 2. - Create a user account in Message Server 6 on Computer "A"
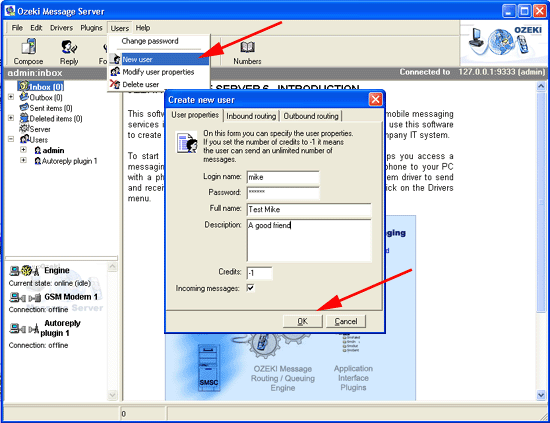
To create a user account in Message Server 6, you need to click on the User menu and select "New User". This will bring up a form, that allows you to enter the username and the password. In our example we use "mike" as the username and "abc123" as the password. In the example we also set the credit limit to -1 and check the "Incoming messages" checkbox to allow unlimited two way SMS communication from the client (Figure 2.). Click OK to apply settings.

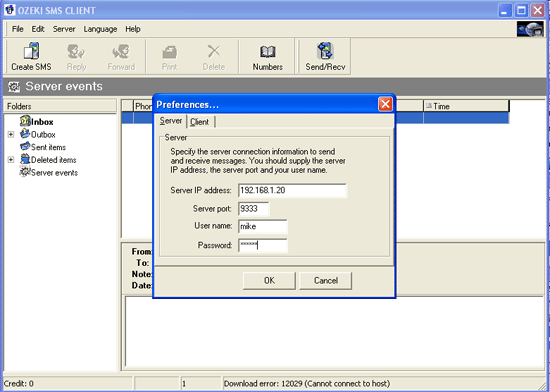
Once the user account is set up you can go to computer "B" and install the Ozeki SMS client. The Ozeki SMS client should be configured to connect to Ozeki Message Server 6 using the newly created user name and password. In the configuration form you should enter the IP address of computer "A", in our case 192.168.1.20 and port 9333. (Figure 3)

