How to set up an SQL - SMS gateway
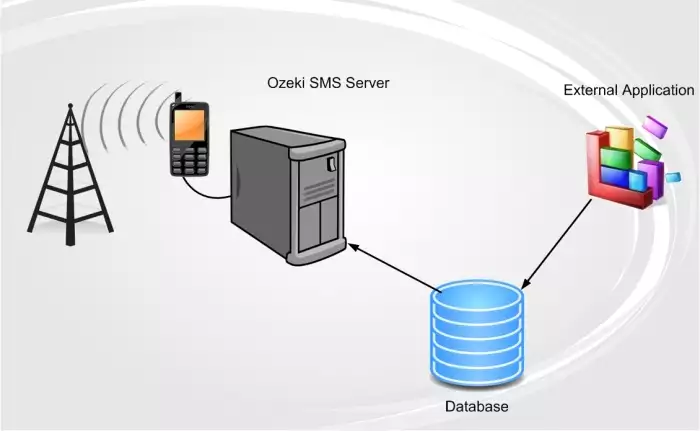
This section gives information about the major steps in setting up an SQL-SMS gateway. The gateway functionality uses the following system architecture: (Figure 1).
An Ozeki Message Server 6 SMS Gateway software is installed on a windows server. It uses a GSM modem to send and receive the SMS messages. (IP SMS connectivity can also be used.) The Ozeki Message Server 6 SMS Gateway software connects to a database over the network using an ADO connection. The database can be a MySQL, Oracle, MSSql, SyBase, Access, PostgresSQL or any other database that has an ADO or an ODBC driver.
The software uses two database tables in this database, one for outgoing and one for incoming messages. The SMS Gateway queries the outgoing database table periodically using an SQL select statement. If it finds messages it downloads them and sends them. During and after sending, it updates a status field in the database to notify the application about what happened to the message. If an incoming message is received, it is saved into the incoming database table.

To create this functionality you need to go through the following steps. Most of these steps require custom action depending on you database server, but if you can manage your database server they shouldn't cause any problem.
I. Work on the database server
Step 1.) Create the database tables
First you have to create the
database tables: ozekimessageout and ozekimessagein. The layout of these tables can
be found on the following webpage:
http://www.ozeki.hu/index.phtml?owpn=422. You
can put these tables in any existing database or you can create a new database
that would only have these two tables. For example in a MySQL environment,
you can create a text file called createdb.sql, copy the SQL table definitions
into this text file and could execute the following commands:
| C:\mysql> echo "create database ozekidb" | mysql -u root
C:\mysql> type createdbmysql.sql | mysql ozekidb -u root |
Step 2.) Create a user account that Ozeki Message Server 6 can use to access these tables. Make sure this user account has SELECT, INSERT, UPDATE permissions for both of the newly created database tables: ozekimessageout and ozekimessagein. On MySQL you would use the following command to create the user account:
| C:\mysql> mysql mysql -u root mysql> insert into user values ('%','winduser',passsword('winpass'),'Y',... C:\mysql> mysqladmin flush-privileges -u root |
Step 3.) Set up the firewall. If the database server is located on a
different computer, you might need to configure your firewall to allow Ozeki
Message Server 6 to connect to your database server remotely. For example
if your MySQL database server is located on a Linux box, you would use the
following command to allow connection on port 3306 to your MySQL server. You
can do this by issuing the following command:
| [root@linux root]# iptables -I INPUT -p tcp --dport 3306 -j ACCEPT |
II. Work on the SMS gateway functionality
Step 1.) Install Ozeki Message Server 6 on your
Windows Server
In your SQL - SMS gateway, the SMS sending and receiving will
be handled by Ozeki Message Server 6. This means that you need to install it
onto your Windows computer. You can have Ozeki Message Server 6 and
your database server installed on different computers but for higher
performance it's better to have them on the same PC. The installation
procedure for Ozeki message Server 6 is explained
in the Ozeki Message Server 6 Installation guide,
the latest version of this guide can be found on the following
URL: http://www.ozeki.hu/index.php?owpn=185
Step 2.)
Configure the GSM Modem
If you have installed
Ozeki Message Server 6, you need to configure a driver to have SMS connectivity.
You can set up one or more GSM modems or IP SMS connections.
Step 3.)
Optionally install an ODBC driver
Microsoft Windows has built in drivers for many database servers (MS SQL,
Oracle, Access, etc), but some database servers require you to install
a database client that will make ODBC connectivy or ADO connectivity possible.
For example MySQL requires you to have MyODBC installed.
Step 4.)
Install the Database plugin
Once you have the database client or appropriate
ODBC driver installed, you can start the installation and the configuration of the
Database plugin in Ozeki Message Server 6. The database plugin installation guide
(latest version is available
at http://www.ozeki.hu/index.php?owpn=535) gives
you all the possible options you can use to set up the database plugin. The
most important things to configure in the database configuration form is the database
connection string and the SQL command templates. The database connection string
contains the connection parameters for your database server. It can be entered
manually or can be created with the "Build database connection" button. The
http://www.ozeki.hu/index.php?owpn=37 webpage
and the next chapter gives information about the possible connection strings.
The SQL command templates describe the SQL statements that are used to work with
the database. You can see how the SQL templates can be configured in the following
chapters.
Step 5 .)
Modify the service user
The last step to get the SMS - SQL gateway
working is the changing of the service user. By default windows services are
executed by the SYSTEM account on Windows computers. Since Ozeki Message Server 6
runs in the background as a system service it is also executed by the SYSTEM
account. Unfortunately on most systems the SYSTEM user does not have access
to the database settings configured using the user account you use when
you log onto your Windows system. This can be worked around if you change
the service Log On parameter for the Ozeki Message Server 6 service.
The following webpage and the next chapter gives you information on how this
can be achieved: http://www.ozeki.hu/index.php?owpn=536
