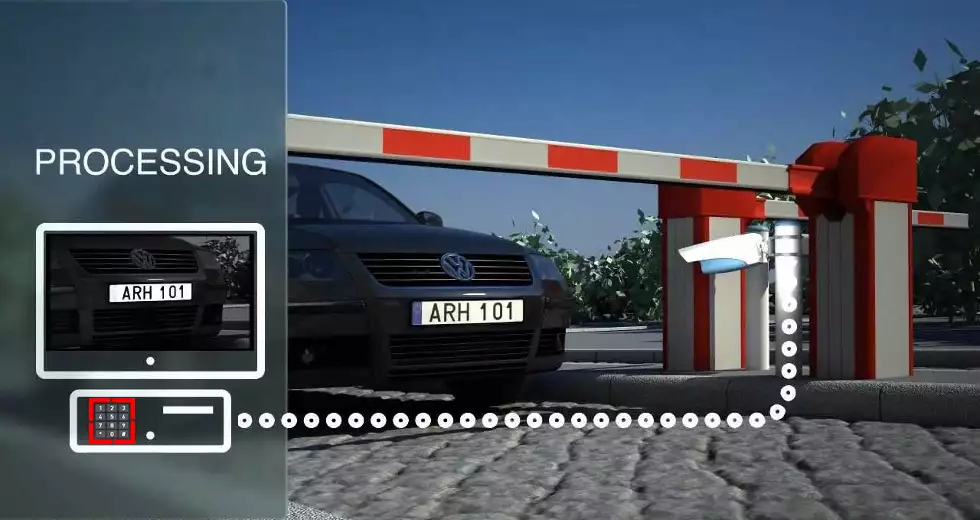
Detecting vehicle license plates
These chapters of the Ozeki guide discusses data acquisition, so the following tutorial shows not only how
to detect license plates, but also how to add them to your SQL database. Use an USB camera to watch the vehicles
arriving and leaving your barrier or vehicles stopping in your restaurant's parking lot. Detect VIP guests
and make them feel more appreciated at your company.
At the beginning of this guide, you will see how to add a license plate filter connection.
Please make sure that you have an USB camera connected to your Ozeki 10 server machine
and also an SQL database server running that you have rights to.
ADD CAMERA FILTER
STEP 1: Install Ozeki 10 anywhere
Install Ozeki 10 on a computer that is placed in the zone that will be used for vehicle license plate detection. You can download the latest versions for Windows, Linux or Android at http://www.ozeki.hu/index.php?owpn=231
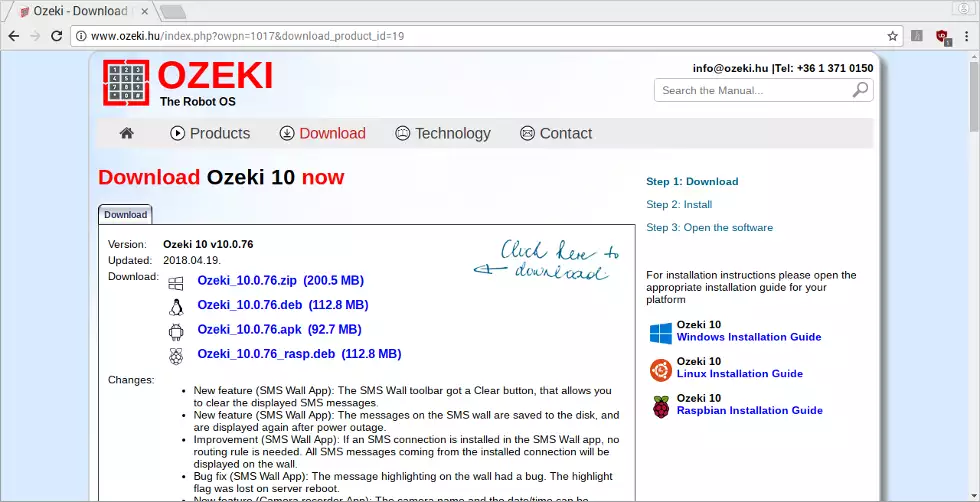
STEP 2: Connect USB camera to Ozeki 10 machine
It is likely that you have an USB camera. Please plug it into the same machine that you have just installed Ozeki 10 on and position it in a way it can see license plates. Low resolution cameras are supported as well.
STEP 3: Start Ozeki Control Panel
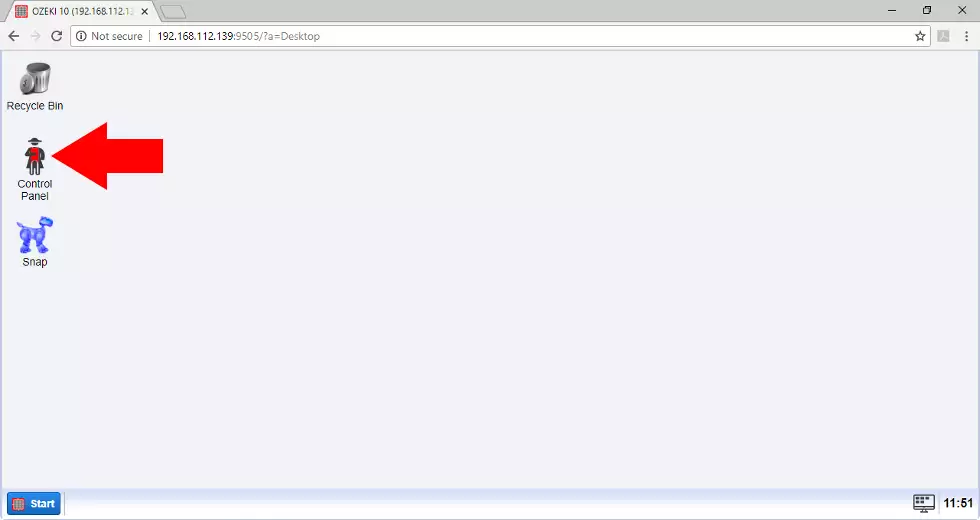
From now on you can reach Ozeki 10 and the USB camera from any location. Just use the IP address of the server and the default Ozeki 10 port, which is 9505. Start building your solution by clicking the red Napoleon icon, because the Control Panel can add and route all Ozeki connections.
STEP 4: Create new license plate filter
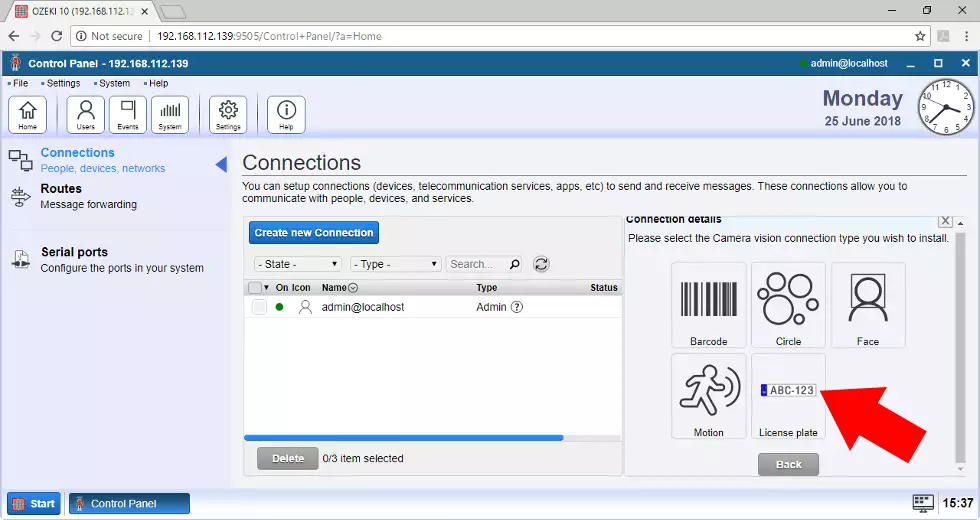
You do not have to add a separate USB camera connection. Navigate to the license plate creation with the 'Create new Connection' button and select 'Video/Vision/License plate' to add the filter. The route is made of beautiful icons. Just click through the route to reach the license plate form.
STEP 5: Add USB camera to filter
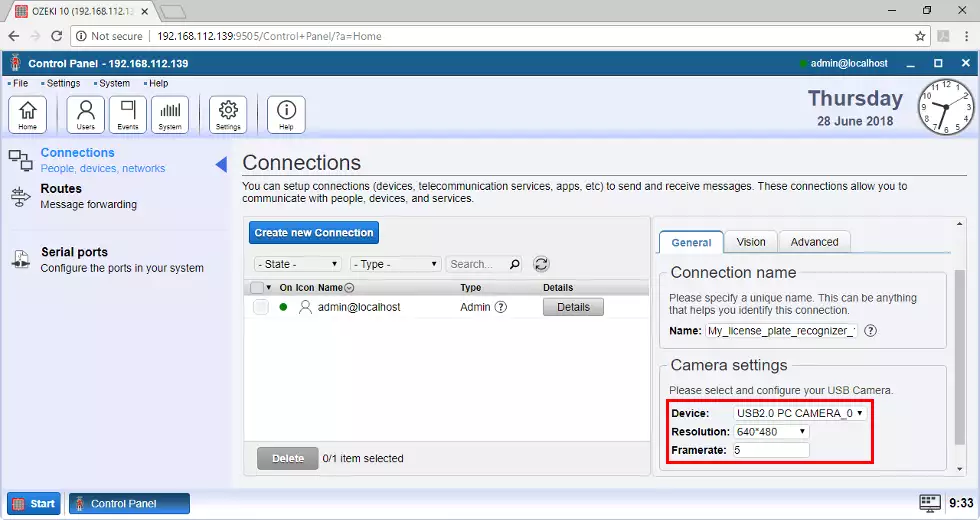
Now you can select your USB camera, resolution and framerate. You can also change the default license plate region, which is Europe, but United States and Australia is also supported. Other license plate formats can be supported too in the future. It all depends on Ozeki's customer base.
STEP 6: Test license plate filter
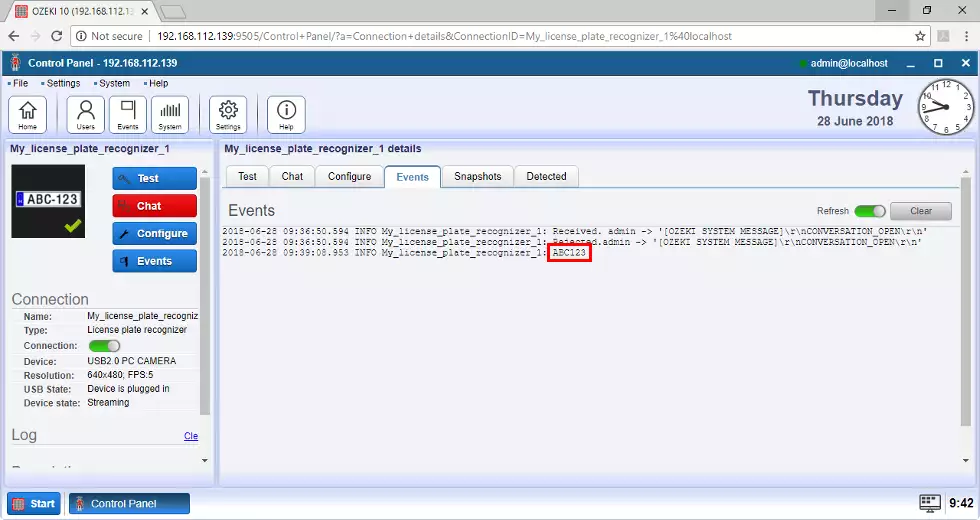
You can easily test it by clicking on the freshly created visual connection, but please wait until the dot changes from red to green just left to the connection. Select the 'Events' tabpage and capture a license plate with the camera. Try a real one, but it even works if you find one with your browser.
CREATE SQL RECORD FROM PLATE NUMBER
STEP 7: Start Database application in Ozeki 10
You just made sure if the license plate detector works by checking it's events, so please navigate to the following Ozeki 10 application:
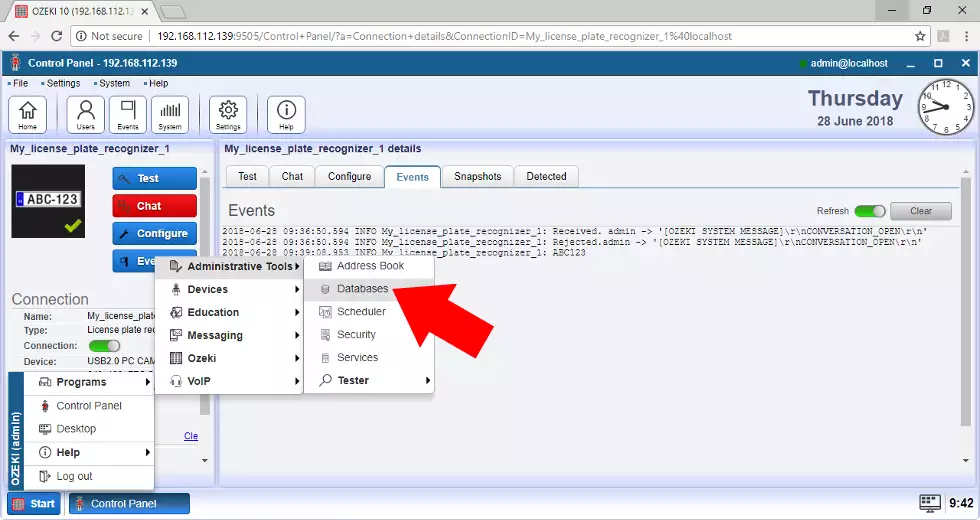
Ozeki's Start menu/Programs/Administrative Tools/DatabasesThis application can connect to the SQL database you use or know about. To connect you will need some extra data which is required in STEP 9.
STEP 8: Select the type of database server
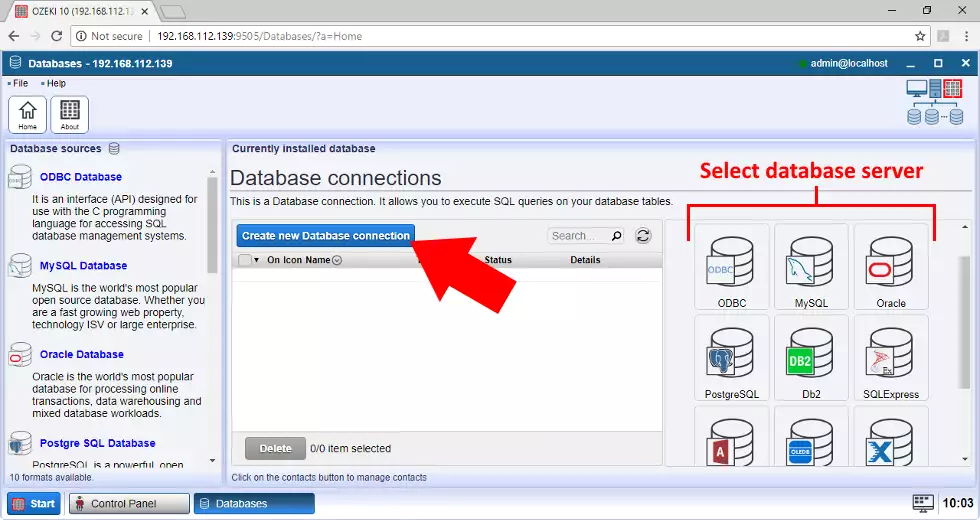
As you can see ODBC, MySQL, Oracle, PostgreSQL, Db2, SQL Server Express, MS Access, OLEDB, Informix and SAP SQL Anywhere are supported by Ozeki 10. You can reach the selection menu by clicking the wide blue 'Create new Database connection' as you can see on the screenshot below. It is suggested to use a database server already used by you or the one you are most familiar with. For example you can try XAMPP. It uses MariaDB, which works like MySQL. XAMPP was used for this guide.
STEP 9: Fill database connection form
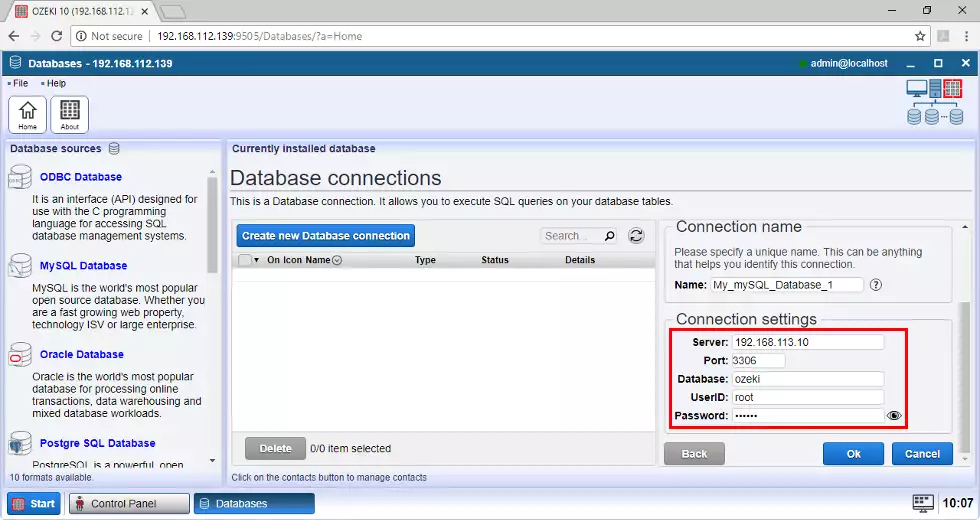
After selecting your SQL server, you must figure out your database's connection data. First check the IP address of the SQL machine with 'ipconfig' or 'ifconfig' commands. The default port number is 3306 for most database servers. You also have to know the database's name and the corresponding username and password. Connect to it by pressing 'Ok' and if you have done it right, the green dot will glow next to the SQL connection. The dot will stay red if there is mistake in the login details or the operating system running the SQL server is currently offline. The other case of a red dot can be an IP restriction rule for your SQL user. You must have rights to reach the user from the IP address of Ozeki 10. Give global access with %.
STEP 10: CREATE TABLE to store license plate records
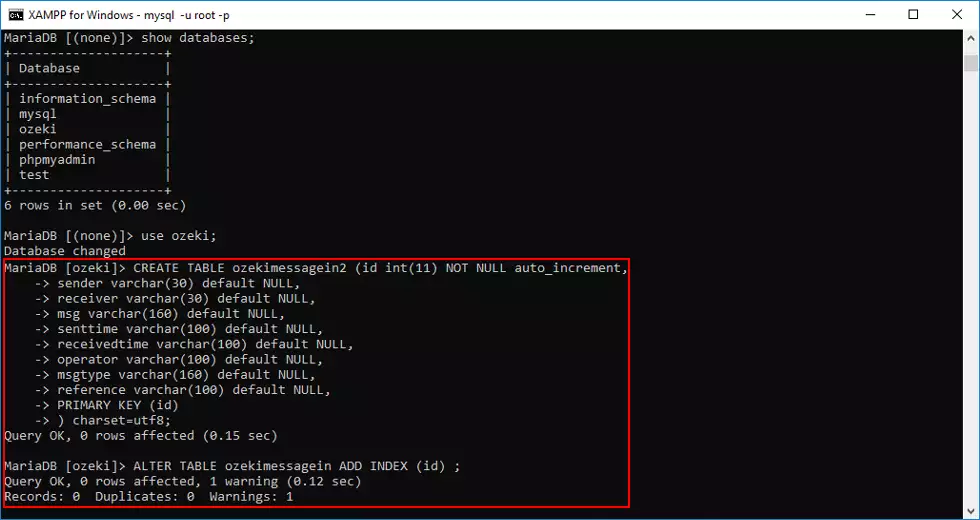
http://www.ozeki.hu/attachments/5972/create_license_plate_table.txt (copy)Sit in front of your database server to create a table for incoming messages. Each message will contain a freshly detected license plate of any vehicle. Please log in to the database server through the command line. For example if using MySQL type 'mysql -u username -p'. Then you will be asked for your password. Use a database or create a new one and copy-paste the txt file content from above to create a new table. It will store the detected license plate numbers. The time of detection with the name of the sender can also be saved in SQL records. The sender is the Ozeki 10 connection that has read the plate. It can detect different regional formats.
STEP 11: Add SQL messaging connection
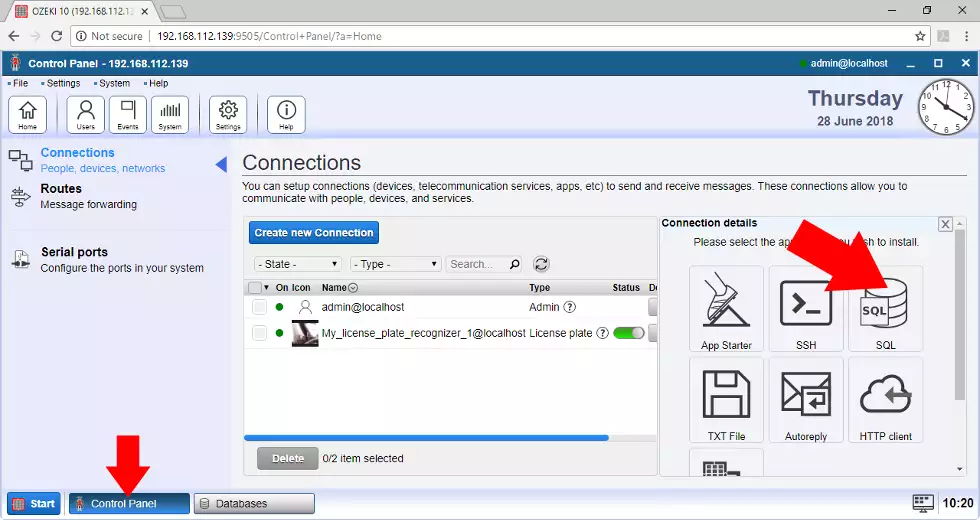
It is time to teach Ozeki 10 how to fill up the database. It is simple. Jump back to Ozeki 10's Control Panel, which should be placed on your taskbar. You can open it from Ozeki's Start menu if you have closed it before. Go through the following icon route to create an SQL messaging connection on the top of your SQL connection: Click 'Create new Connection' to start then select 'Application' and 'SQL' with the icon you can see on the screenshot. First you have to select your database connection on the 'General' settings tabpage then switch to the 'Receive' tabpage and continue with STEP 12.
STEP 12: Configure how to INSERT license plates
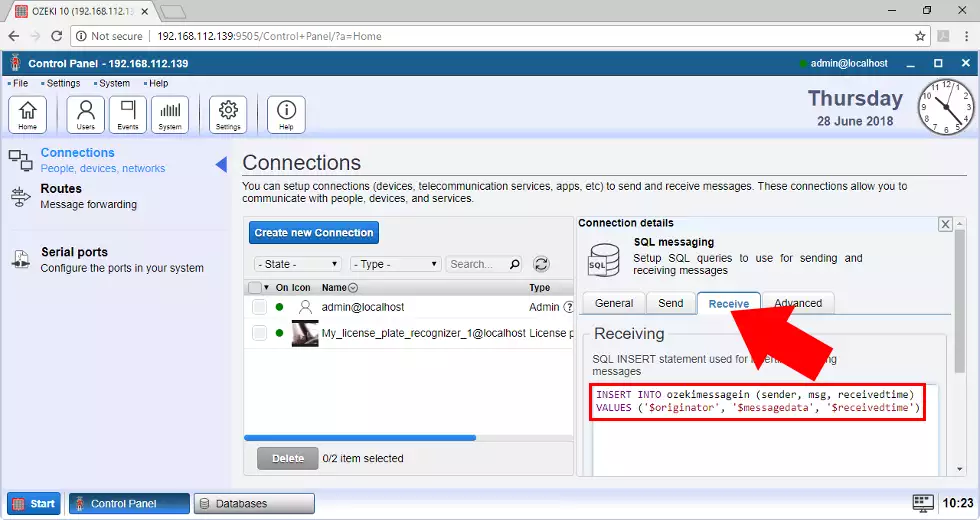
Here you can define the SQL INSERT statement that is called all the time this SQL messaging connection receives a message. The statement can look the following way. It inserts a license plate record to the SQL table:INSERT INTO ozekimessagein (sender, msg, receivedtime)
VALUES ('$originator', '$messagedata', '$receivedtime')
$originator is the name of the Ozeki 10 connection sending the messages.
STEP 13: Create route between filter and database
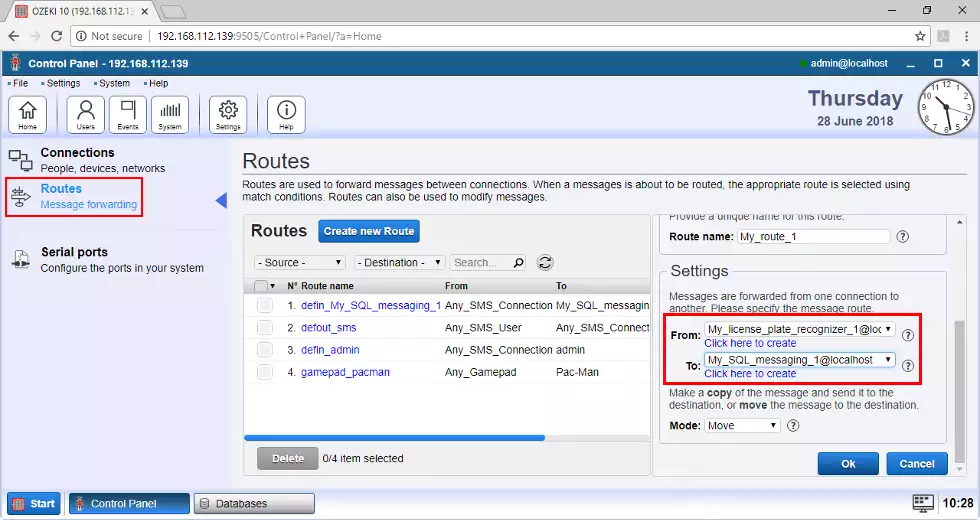
Messages can be received from any other Ozeki 10 connection to create a new record in the database. This step shows how to route the license plate texts towards the database. On the left side vertical toolbar panel you can find the 'Routes' tab. Please click on 'Create new Route' to pair the license plate recognition and the database messaging connection and click 'Ok' to save the route. Ozeki 10's messaging engine works on the defined routes. Test your new route by looking at a license plate with your USB camera.
STEP 14: SELECT * with Ozeki 10
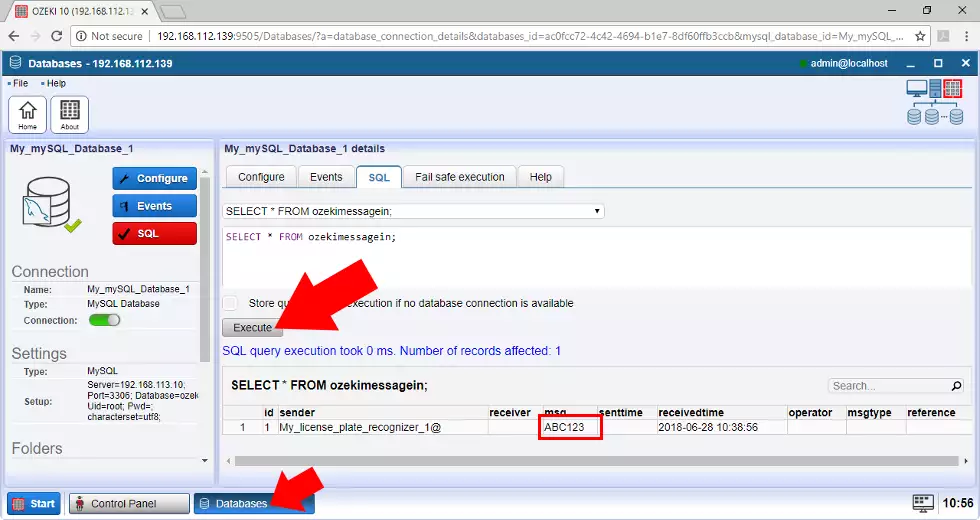
Switch to the 'Databases' application to send this SQL statement:
SELECT * FROM ozekimessagein;Run it by clicking on the connection and selecting the 'SQL' tabpage. If it finds 0 records, check the event log of the license plate filter. If the log is empty, try positioning the camera until the license plate number is detected.
STEP 15: SELECT * FROM the license plate table
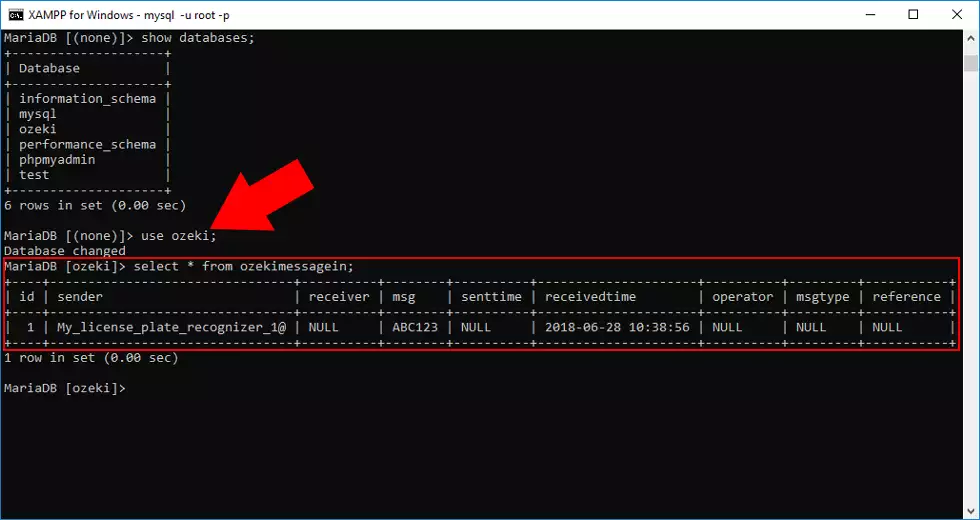
By typing the same statement used in the last step, you can make sure that the information is really in the database. Keep in mind to directly test the statement on the SQL database. For example by using the SQL command prompt like on the picture below. Do not forget to switch to your database before executing SELECT * FROM. Do this by typing 'use databasename;'
Detect license plates where a vehicle can stop
It is good to know that you can detect license plates easier with higher resolution cameras, also cleaner plates can get better filtering. Remember that detecting plates on high speed vehicles is not guaranteed, so please use your USB camera to detect slow vehicles or use it for cars stopping before a barrier. The color or shape of the vehicle doesn't effect detection.
