Temperature to SQL
In this guide, you can learn how to save periodically temperature datas and its measurement dates to your seperated database. To start this tutorial, you need an Ozeki 10 software installed on your PC, an Arduino Nano and a DHT sensor. Furthermore, you also need a database management system to save the incoming temperature values. This guide will show you how to do it using MySQL, but Ozeki 10 supports various database types, so you can use it with other database management systems as well. Let’s get started!
STEP 1: Prepare your temperature sensor STEP 2: Connecting and setting the temperature sensor STEP 3: Create database Table in your MySQL account STEP 4: Add your Database to Ozeki 10 STEP 5: Create route from temperature Sensor to Database
Detailed description
STEP 1: Prepare your temperature sensor
Please prepare the required parts for your sensor circuit. If you would like to build the circuit as fast as possible, it is suggested to plug the wires into a breadboard (Figure 1). The most important is to power up your DHT sensor with GND and 5V. Simply by connecting the GND pin of the Arduino Nano and the GND pin of the DHT sensor, plus connect the 5V output of the Arduino to the VCC pin of the DHT sensor. Also do not forget to connect the Data pin of the sensor to the D2 digital pin of the Arduino, which is the default DHT pin in the required Ozeki libraries. Finally plug in the Arduino to your PC with a mini USB cable. Do not forget to download Arduino IDE, so you can upload the codes.
Required components
- Breadboard
- Arduino Nano
- One Temperature and Humidity sensor from the following
DHT11: - 0-50 °C (+/- 2°C accuracy)
- 20-80 RH (5% accuracy)
- Gets new data in every 2 seconds
DHT22: - -40-80 °C (+/- 0.5°C accuracy)
- 0-100 RH (2-5% accuracy)
- Gets new data in every 2 seconds
- 3 wires
- Mini USB cable
Hardware setup
As you can see you only need to connect your Arduino Nano with your DHT sensor module with just 3 wires then plug the Arduino to your Ozeki 10 PC with a Mini USB cable. On Figure 1 you can see the connection with a DHT22 sensor module.

EEPROM format
If you have used your Arduino Nano many times before. The EEPROM can be full of unnecessary data. It is highly suggested to upload the EEPROM format code before uploading the DHT sensor codes. To check if the EEPROM format has been successfull, please open the serial command line in your Arduino IDE. You can find the Arduino EEPROM format code both on www.ozeki.hu or in your Ozeki 10 as seen on the video below.

DHT sensor control code upload
'OzDHTSensor.h' is automatically placed in your Arduino library when installing Ozeki 10. Then easily copy the DHT programcode from ozeki.hu or from Ozeki 10's browser GUI to your Arduino IDE. The code uploading sequence is demonstrated in the video below. Do not forget to rewrite the constructor if you use DHT22 or leave it on DHT11.
You can use the following constructors depending on your DHT sensor module:
//DHT11 sensor connected to D2 pin
dhtTemperature = new OzDHTSensor(DHT11,DHTMode::Temperature,2);
dhtHumidity = new OzDHTSensor(DHT11,DHTMode::Humidity,2);

/* OR */

//DHT22 sensor connected to D2 pin
dhtTemperature = new OzDHTSensor(DHT22,DHTMode::Temperature,2);
dhtHumidity = new OzDHTSensor(DHT22,DHTMode::Humidity,2);
STEP 2: Connecting and setting the temperature sensor
After you have assembled the Arduino Nano with the DHT sensor and have connected it to the PC, you need to log into Ozeki 10 system by opening your web browser at localhost:9505 then typing in your username and password. In order to set the temperature sensor, the Control Panel application is needed. To open it, navigate to Start menu then click on it as you can see on Figure 2.

After it has opened, the Connection view will appear as default (Figure 3). Here, you will see all the connected entities. The system detects automatically all the sensors and actuators included the previously connected DHT one. It makes two connections named humidity and temperature sensors. Please, find the lastly mentioned one as TemperatureSensor_1 then click on its Details button.

In this Details view, navigate to Configure tab (Figure 4). In the group box named Periodic read you can set a period of time to read the sensor’s value. Check the checkbox named Read data periodically to enable polling and set the interval you would like then click on Ok. Now, you finished with the configuration of the temperature sensor. If you would like to test if the sensor works well, you can do it under the Test tab by clicking Measure.

STEP 3: Create database Table in your MySQL account
To continue this guide, a database management system is needed. Ozeki 10 supports a variuos type of databases included Oracle DB, MySQL, PostgreSQL, MS Access etc. So it does not matter which one you would like to use. The important thing is that, you should create a new database in your database management system which will be set for Ozeki 10 to save and store the incoming temperature values and its measurement dates. To create a structure for these values, execute the following SQL code in your previously created database:
CREATE TABLE temperature ( `id` int primary key auto_increment, `value` varchar(100) not null, `date` varchar(100) not null ); |
If you are using MySQL, you can verify if the temperature table created correctly by using the database management system’s command line. On Figure 5 below you can see what you need to type in for testing as well as what you should get.

STEP 4: Add your Database to Ozeki 10
To allow for Ozeki 10 to connect to the database that you created in the previous step, you have to create a new database connection for it. You can do it in Control Panel by clicking on Databases view that you can see on Figure 6. In the grid at middle, you will show all the databases connected to the system. To create a new one, click on Create new Database connection button then select your database type from the right hand panel.

On this panel under General tab, you see all the configuration details that you have to set correctly (Figure 7). The server address and its port depends on the database's settings, but if it is installed on your currently used PC, the address is localhost and the port is usually 3306. Type the name of the database that you created before then the user ID and its password to connect. Finally, click on Ok.

If you did everything right, the connection will show up in the Database connection grid as a SQL type of database connection named My_mySQL_Database_1 and its status turn to green like connected (Figure 8). If it is maybe red, it means that the Ozeki 10 can not connect to the database due to incorrent settings or connection error.

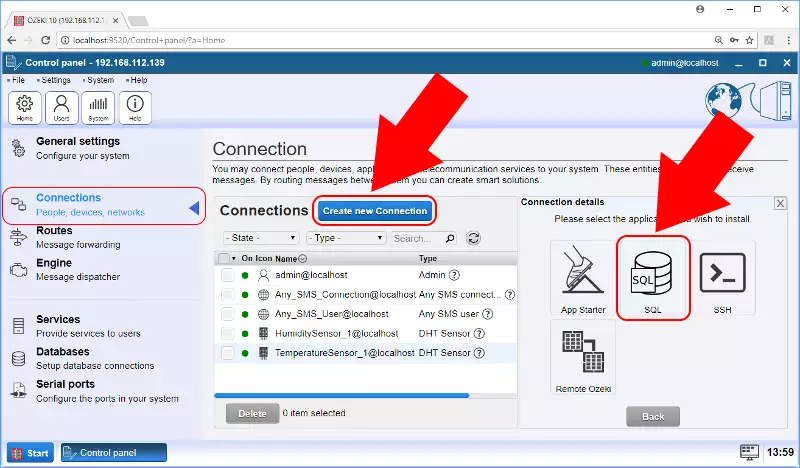
Ozeki 10 communicates with its related entities using messages. In order to send messages that contains information about temperatures to this database, you need to connect it as a connection. To do it, navigate to Connections view again. Then create a new connection for it by clicking on Create new Connection. On the right-side panel, select Application then SQL option as you can see on Figure 9.
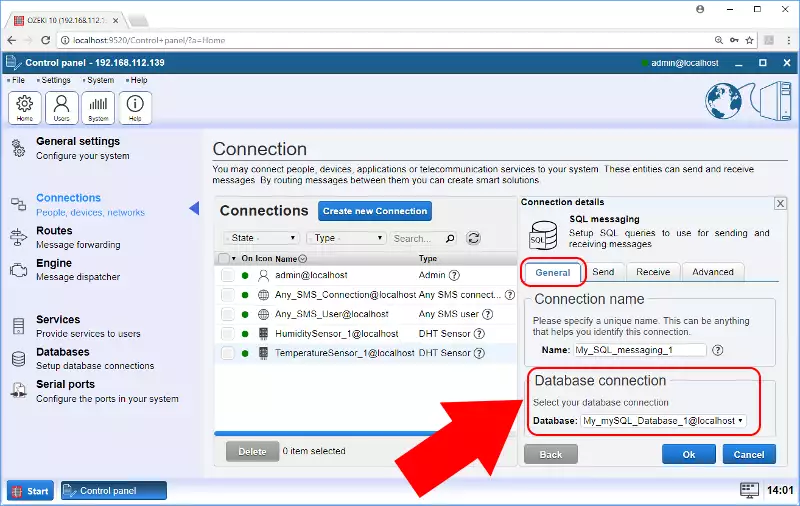
Under General tab (Figure 10), you can set the name of the connection that you can refer to in the future. Then in the Database connection group, you need to select the database you previously added to the system.
The messages that come from the connection of DHT sensor contain the temperature values and its measurement dates as a "messagedata" and a "receivedtime". To insert these incoming messages to the database, you should navigate to Receive tab (Figure 11) then give the following SQL INSERT statement that manages these values to the database:
INSERT INTO temperature(value, date) VALUES('$messagedata', '$receivedtime');
After you have pasted it to the textbox, you can click on Ok button.

Finally, the connection will appear in the Connection grid as an SQL type of connection and its connection status should be green as you can see on Figure 12. Now, all the entities connected to the system can send messages to this connection.

STEP 5: Create route from temperature Sensor to Database
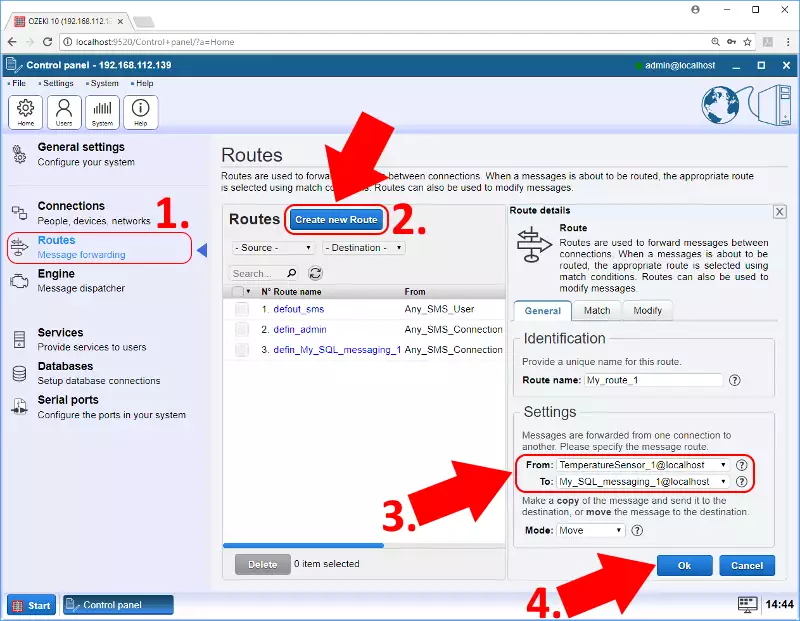
To forward messages from connection of temperature sensor to the database’s connection, you have to create a new route. To create one, select Routes item on navigation panel then click on Create new Route. On the panel at right side (Figure 13), under Settings first you need to select the temperature sensor connection, then the SQL connection and click on Ok. Thanks to this, you grant that the messages from the temperature sensor will be forwarded to the database’s connection that will insert the contained values to the database.
Now, the system started to work and it saves the temperatre values into the given database automatically. Hereinafter, you can see how to access the stored values. In Ozeki 10, you can use queries to get datas from connected databases. To perform this, navigate to Databases view then select the Details button of database connection (Figure 14).

Under SQL tab, executing the following querty, you can get all the stored datas from the previously connected database:
| SELECT * FROM temperature |
