How to use an Ardiuno Analog Sensor
The following guide provides you some useful information about Arduino analog sensor (also known as Potentiometer). This sensor can be used to adjust the brightness or the blinking rate of an LED. This document also ensures a step by step guide about how you can easily manage the analog sensor from your computer by using Ozeki 10. So, let's get started with the basic definitions.
What is an Arduino analog sensor?
The Arduino analog sensor can be also called as potentiometer. This sensor is just a simple knob that can be directly connected to your Arduino. The sensor provides a variable resistance that the Arduino board can handle as an analog value. With this value, the board can adjust, for example, the brightness value of a connected LED.
How to use an Arduino analog sensor?
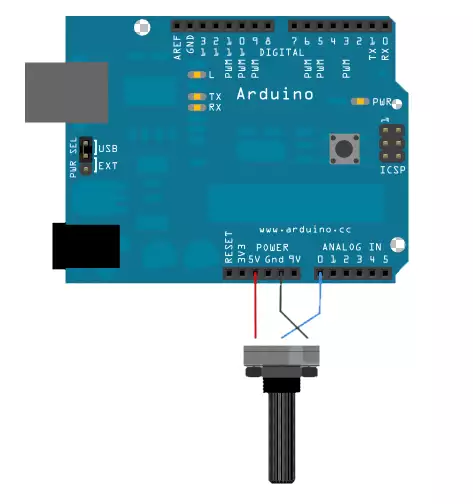
To use the analog sensor, first of all, you need to connect three wire to the Arduino board. The first one goes from one of the outer pins of the analog sensor to ground (Gnd). The second wire goes from the other outer pin to the 5 volts (5V). The third one needs to be connected to the analog input 0 from the middle pin of the analog sensor.
As we turn the shaft of the analog sensor, it changes the resistance on either side of the wiper which is connected to the middle pin of the potentiometer. The board reads the adjusted resistance and converts it to an analog value. This value is a number between 0 and 1023 which represents how much resistance is on the wiper between 0 and 5 volts.
Arduino analog sensor wiring diagram
How to use an Arduino Analog Sensor in Ozeki
With Ozeki Analog Sensor devices you can read analog pins of the Ozeki Analog Sensor or any Arduino module. Each device can handle a single pin. Analog pins can get integer values from 0 to 1023. These values can change to either direction. To prevent reading insignificant changes you can set a threshold of the Ozeki Analog Sensor device. To use the Analog sensor in Ozeki, you first need to download Ozeki Robot Developer. Ozeki Robot Developer will install the Arduino libraries needed to use this sensor efficiently.
Download Ozeki Robot Developer

After Ozeki Robot developer is installed, you need to upload the Analog sensor control code to your Arduino. You can find the code and download instructions on the following pages. The upload process includes two steps: first you need to format the EEPROM of the arduino, then you need to upload the control code. The procedure is very simple, it only takes a few seconds.
Upload the Analog sensor code to Arduino Uno
Upload the Analog sensor code to Arduino Mega 2560
Upload the Analog sensor code to Arduino Nano
Upload the Analog sensor code to Ozeki Matrix
The arduino sensors and Ozeki will communicate over the USB port using the Ozeki Analog sensor protocol. This protocol makes it possible for you to use the sensor directly on your PC. You will be able to control this sensor through the web based user interface or you will be able to communicate with it using Ozeki Chat. You can read more about chat control on the following page.
How to communicate with the Analog sensor using chat
It is important to understand chat control, because when you build a robot, the way you wish to control this sensor is by sending and receiving messages. If you open the Ozeki Robot Developer app, you will see, who you can write a C#.Net program to work with this sensor.
Connection steps
- Connect the Analog sensor to your Arduino using the wiring diagram
- Plug the Arduino board into your computer
- Check the COM ports to make sure your Arduino is connected
- Open the Arduino application on your computer
- Upload example code to the Arduino
- Open https://localhost:9515 in your browser
- Select the connection of Analog sensor
- Click 'Measure' to get data from the sensor
System overview
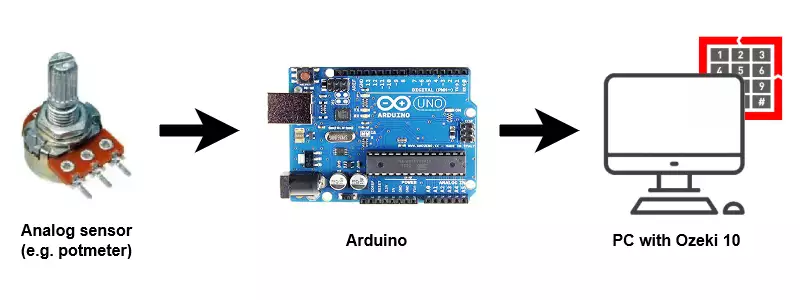
The system we suggest consists of an analog sensor, that is wired to the analog port of your Arduino. The Arduino will be responsible for reading data from this sensor in real-time. The brain of the system will be running on a PC (Figure 2). On the PC, Ozeki 10 will be able to manage the communication. You can easily run Ozeki 10 using a webbrowser.
Videos below will show you how to wire your Analog Sensor (e.g. potentiometer). It is advised to read measurements with your Ozeki Software as you can see in the last video. Finally, you can store the sensor data in any SQL database (Figure 1).
Prerequisites
- Analog sensor (e.g. potentiometer)
- Programmable board (Arduino Mega/Nano/Uno, Ozeki Analog Module)
- Ozeki 10 installed on your computer
- USB cable between the board and your computer
Step 1 - Wire the analog sensor to your Arduino
You can see how to wire the analog sensor (such as potentiometer)
to any of the following boards:
After wiring, please plug the board to your computer!
Step 2 - Upload the code to the Arduino
Step 3 - Start Ozeki 10 to test the analog sensor
Step 4 - Configure your analog sensor in Ozeki 10
In order to configure your analog sensor (attached to your Arduino) in Ozeki 10, that is installed on your computer, you need to open the graphical user interface (GUI) of Ozeki 10. You can open the GUI by entering the URL of the computer into your webbrowser. For example, if our PC has an IP address of 192.168.1.5, we would enter http://192.168.1.5:9513 into our webbrowser.
Step 5 - Understand the analog sensor protocol
The Analog Sensor can communicate with Ozeki through the following protocol.
References:
https://www.arduino.cc