VoIP PBX phone controlled barrier
This guide shows how to implement a VoIP PBX phone controlled barrier system. If there is an incoming call, the system accepts it and reads aloud the welcome message then wait for the gate code to enter. If the caller entered it, the control PC will turn the barrier control relay to on state for 10 seconds to open up the barrier. After 10 seconds passed, the system will close down it.
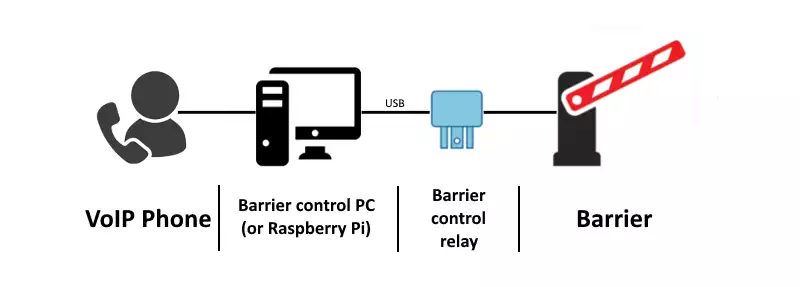
Step 1: VoIP phone controlled barrier components
Step 2: Setting up Ozeki 10
Ozeki 10 is a messaging system for Windows, Ubuntu Linux and Raspbian OS. It can be used to control a barrier using a VoIP phone. The system communicates with each connected entities using simple text messages. After you have installed the Ozeki 10, it will detect all the connected entities including the relay. To login into the system, please navigate to the a following URL: http://localhost:9505 in your web browser. On the login page please type admin as login name and the password that you have specified during the installation. After successful login, please start the Robot Controller application as you can see on Figure 2.
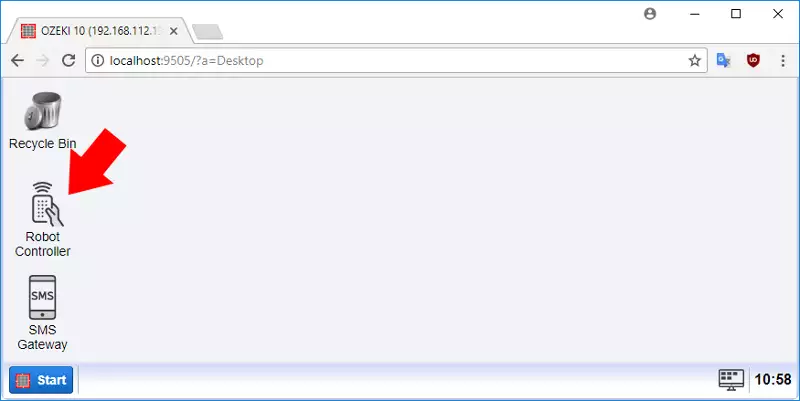
Step 3: Installing VoIP phone line in Ozeki 10
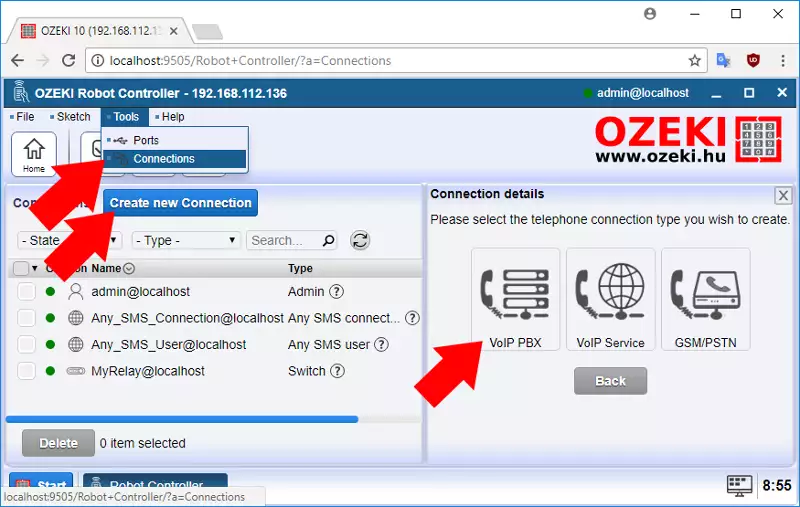
To implement the VoIP phone controlled system, you need to install the VoIP phone line connection in Ozeki 10. By installing this connection, the system will register itself to your local VoIP server to enable to receive phone calls. To install the connection, in Robot Controller application, select the Connection item from Tools menubar. On the right-side panel, choose Telephone then select VoIP PBX (Figure 3).
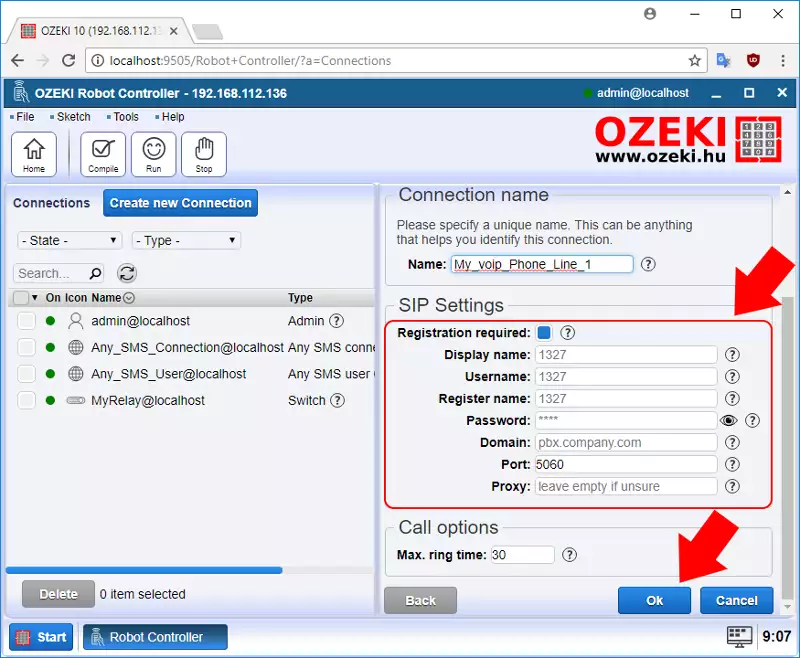
After you fill in all required fields, please install the connection by pressing Ok button (Figure 4). Then this connection will show up in the Connections grid and you need to switch its status to connected state by clicking on the switch (next to the Details button). You will see the pop-up message that the system sent the connection request and its status will change to green.
Step 4: Running the code in robot controller
You can return back to Robot Controller app by pressing the Home button on the toolbar. In the Connection grid found on the right-side, you should see the VoIP line connection named My_voip_Phone_Line_1. You also should see the relay connection as MyRelay that detected automatically by the system after you have connected it to the system via USB. In this Robot Controller, you need to write the logic that controls the messages between the VoIP phone line and the relay connections to implement the phone controlled barrier system. You can execute the code by clicking on the Run button found on the toolbar (Figure 5).
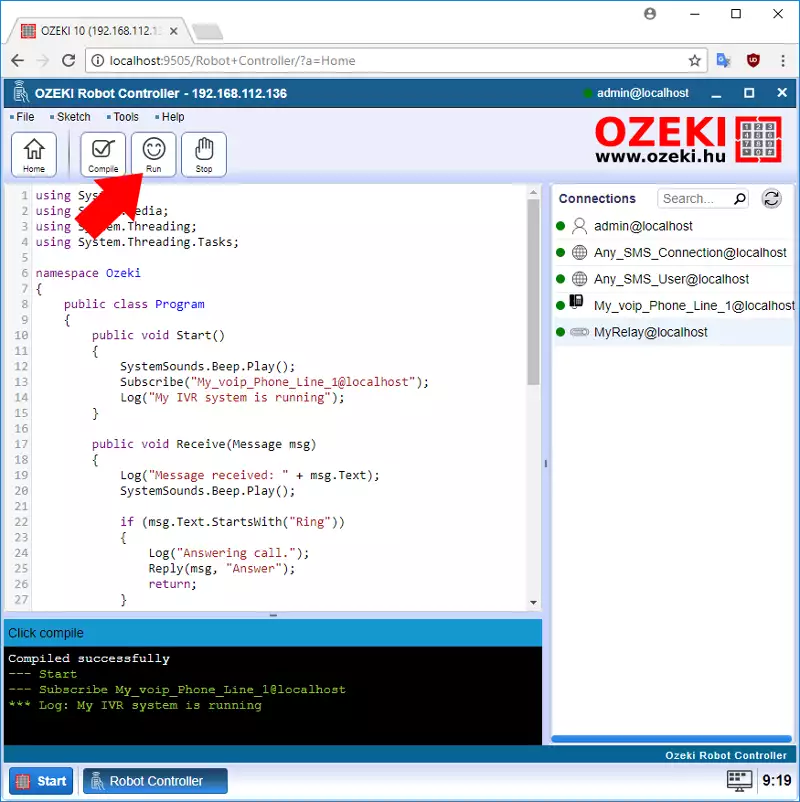
Step 5: Write the code in robot controller
This is the logic of the VoIP phone controlled barrier system. It accepts the incoming calls, reads aloud the welcome messages and opens up the barrier by pressing button 1 on the phone. After 10 seconds passed, it will close down the barrier. Copy the following code and paste it to the Robot Controller then execute it.
using System;
using System.Media;
using System.Threading;
using System.Threading.Tasks;

namespace Ozeki
{
    public class Program
    {
        public void Start()
        {
            SystemSounds.Beep.Play();
            Subscribe("My_voip_Phone_Line_1@localhost");
          	Log("My IVR system is running");
        }

        public void Receive(Message msg)
        {
            Log("Message received: " + msg.Text);
            SystemSounds.Beep.Play();

            if (msg.Text.StartsWith("Ring"))
            {
                Log("Answering call.");
                Reply(msg, "Answer");
                return;
            }

            if(msg.Text == "CallState InCall")
            {
                Log("Sending text.");
                Reply(msg, "Hello, Welcome to the Ozeki Robot Controller."
                + " Please press 1 to open the barrier.");
                return;
            }

            if(msg.Text == "1")
            {
                Reply(msg, "Barrier opened.");
             	openBarrier();
                Reply(msg, "Hangup");
            }
        }

        void openBarrier()
        {
            Log("Opening barrier.");
            Send("MyRelay@localhost","on");

            System.Threading.Thread.Sleep(3000);

            Send("MyRelay@localhost","off");
            Log("Closing barrier.");
        }
    }
};
Step 6: The code explained
The source code has two entry points: the Start and the Receive functions.
The Start function executed automatically by the system when you press Run the
run button. The Receive method is called when there is an incoming message
from the connection for which you subscribed.
In the Start function, you need to subscribe to the VoIP phone line connection
by calling the Subscribe function with My_voip_Phone_Line_1@localhost parameter.
Due to this, the Receive method will be invoked when there is an incoming call
and you can handle what should the system do.
In the Receive function, you can get the messages sent by the subscribed
connections using the Message parameter. If the message starts with "Ring", it
means that there is an incoming call. Using the Reply function, you can answer
to the calls. Replying "Answer" means you accept the actual call and the
connection will be established between the phone caller and the Robot Controller.
If the message text is "CallState InCall", you can reply it with messages that
the system will be read aloud to the caller. When the caller press a number on
its phone, you get the pressed number as a text message.
If the 1 button pressed on the phone, the openBarrier function will be invoked
that will switch the barrier control relay to open state to open up the barrier
for 10 seconds. After it passed, it will close down the barrier.
